
[ad_1]
Every now and then, a photograph comes our way, and it immediately grips us. It’s the type of photograph that makes us say, “We need to know more.” Brandon Casey is the creator of the latest image that demanded our attention. A resident of New Smyrna Beach, Casey has an eye for rocket launches. He’s also a devoted father, and for this photograph, he wanted to combine his passion with the children he loves so dearly.
Although Casey has a wonderful body of work, for this piece we’re going to focus on one photograph. In what we call Creating the Photograph, we’re asking Casey to break it all down. The motivation, the gear, the settings, and editing; we want to know everything about the making of this image.
The Concept
The concept for this photograph really came from my love of fatherhood. I have two young sons, five and seven years old. Watching their imagination develop as they grow has been an incredible experience, and yet, there’s still so much more to come. To me, it is one of the most powerful things in the world, and I wanted to create an image that conveys that power.
Gear Used by Brandon Casey
- Fujifilm GFX 50S II
- Fujifilm GF35-70mm f/4.5-5.6 WR
- Tripod: Benro TMA48CXL Extra Long Series 4 Mach3 Carbon Fiber Tripod
- Tripod Head: Benro GD3WH 3-Way Geared Head
- Main Light: Godox AD400Pro
- Secondary Lights: (2) Godox V860II
- (2) Light Stands
- Fujifilm Cam Remote App for IOS
Initially, there were three things that appealed to me back when I made the switch to Fujifilm: the functionality of the dials, the unique color science that you see in the files, and the design ergonomics of the camera just fit well and felt solid. Over the last couple of years, I have only dove deeper and deeper into the world of Fujifilm. What they’re building is more than just a brand. It’s a living, breathing community of individuals who have such a passion for the product which we use to create images that tell stories and have meaning. Their products are just a joy to use, day in and day out.
The Shoot
The tricky part to making this image happen was finding a launch scheduled on a night when the kids didn’t have school the next morning. I’ll usually track upcoming rocket launches using various apps and websites. Thankfully December was a pretty busy month for night launches and coincided perfectly with their winter break from school. Once we had a launch picked out, the next step was determining the flight path. Knowing the rocket’s flight path is what I use to determine the focal length based on the location from which I’m shooting. Flight paths that are angled towards your location will arc higher in the sky and require a much wider focal length than a flight path angled further away from your position. This launch ended up being an eastern flight path so I didn’t have to shoot too wide from my northern position.
Overall, the shoot itself went very well. Normally I like to get to my planned location about an hour before the launch in order to have enough time to set up, dial everything in perfectly, and still have a little cushion time built-in should something slow me down. But since I had my youngest with me this time, I didn’t want to have too much extra time and risk him getting tired or bored. So instead, we arrived 30 minutes before launch, and as luck would have it, some of the local high schoolers were having a massive bonfire on the beach. We didn’t have any time to completely change locations, so we opted to trek a little further down the beach until any concerns of the ambient light from the bonfire were no longer a concern. I set up the tripod, camera, composed the base composition, and then sat back to enjoy watching the launch with my little guy. After we watched the last bit of light fade from the booster landing on the drone ship, we set up the off-camera lighting, got him suited up, and nailed the right pose within just a few shots.
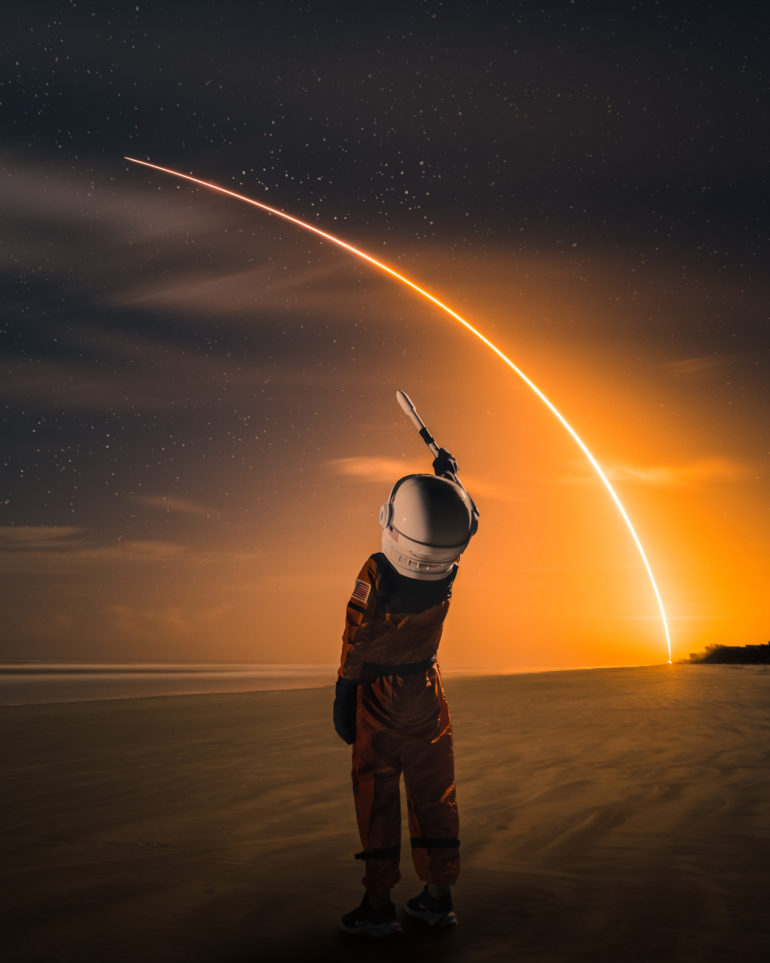
Since the main image exposure is far longer than any one person could hold still for, especially a child, this image was broken down to three different parts;
- Long Exposure Launch Image
Two minute exposure
f/13
ISO 500 - My Son in the Space Suit
1/30 sec exposure
f/13
ISO 500 - Stars
5 second exposure
f/4.5
ISO 2500

Post Production
This shot actually required a fair bit of post-processing to achieve the final result. I moved all three images from Lightroom into Photoshop. The first thing I needed to do was mask my son into the long exposure frame of the rocket. Once I had him masked in, I moved on to correcting the colors on him to match that of the long exposure frame since the temperature output in the flash units is significantly different than the light emitting from the rocket.
While in the field, I set up the main light to recreate the light which would have come from the rocket, a secondary light to recreate the full moon overhead, and a third light right of camera to act as a slight fill. This definitely helped but wasn’t a hundred percent there, so after balancing the colors, I did some dodging and burning on him in order to shape the light in a way that the rocket would have. After I had him blend into the frame with the rocket, the next step was to fix the stars. We see the stars as perfect little pinpoints while we watch a rocket launch. However, during the long exposure, these little pinpoints turn into star trails. To fix this, I usually find a clear section of sky and capture a frame just of the stars.
Once in Photoshop, I’ll use the healing brush to remove all the star trails from the long exposure frame. Then on the frame that I took with just the stars, I’ll adjust the contrast to brighten the stars, and darken the sky. Then change the layer blend mode to lighten in order to hide the dark sky and only let the stars show. Lastly, with a layer mask and brush, I blend the stars back in where they need to be. After everything is done, I save the final blended image back into Lightroom where I make my color grading adjustment to my style, which is the last thing I do.
Brandon Casey’s Goals This Year
This year, I want to keep pushing the creative threshold when it comes to launch photography, and possibly put together a local workshop to help teach other photographers who are interested in long exposure launch photography.
You can learn more about Brandon Casey by visiting his website and Instagram.
Image used with permission.
Creating the Photograph is an original series where photographers share how they created an image with lighting and minimal post-production use. The series has a heavy emphasis on teaching how to light. Want to be featured? Here’s how to submit.
[ad_2]


