Epson Perfection V600 Color Photo, Image, Film, Negative & Document Scanner
From the manufacturer

-

Create extraordinary enlargements from film
6400 dpi and a 3.4 Dmax for 35mm enlargements up to 17″ x 22″
-
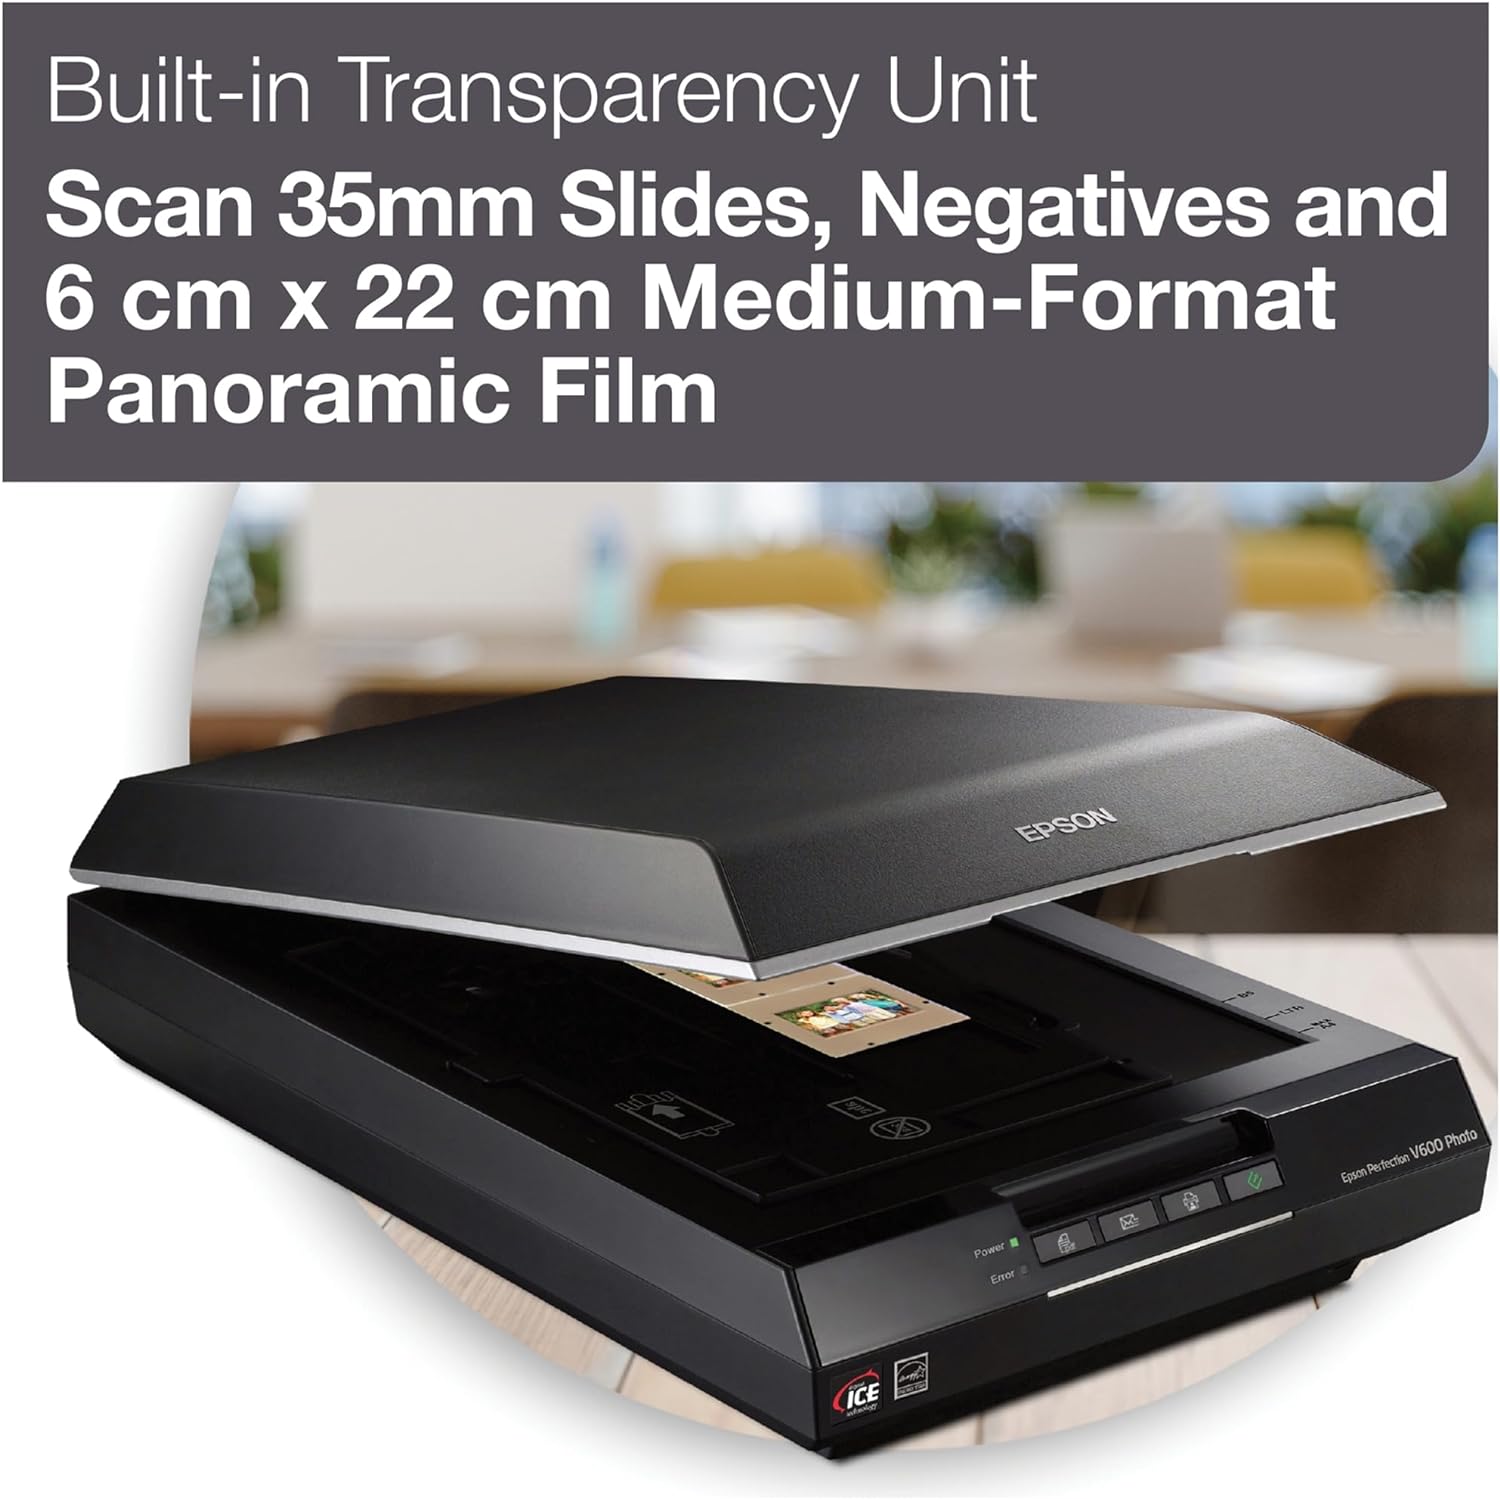
Built-in transparency unit
Scan 35mm slides, negatives and 6 cm x 22 cm medium-format panoramic film
-
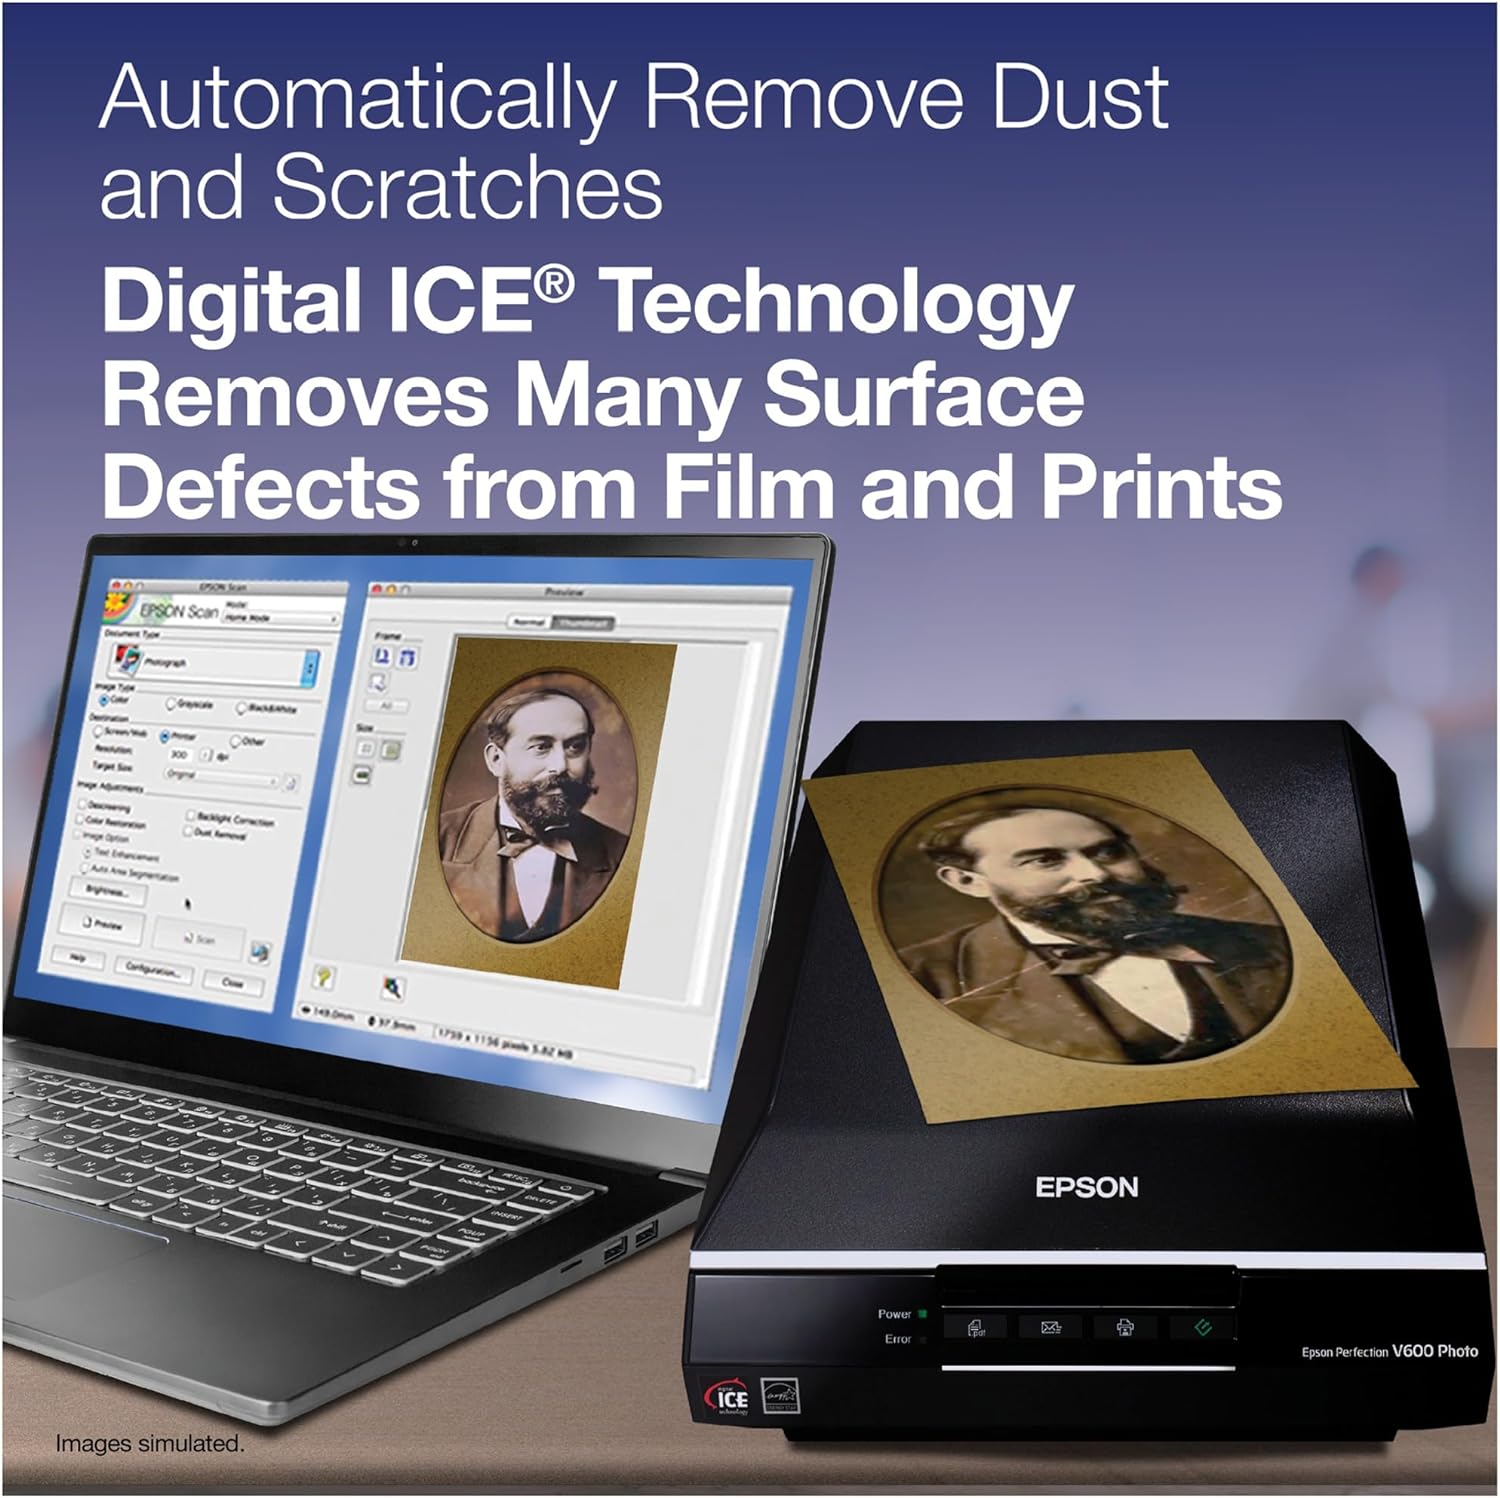
Automatically remove dust and scratches
Digital ICE Technology removes many surface defects from film and prints
-
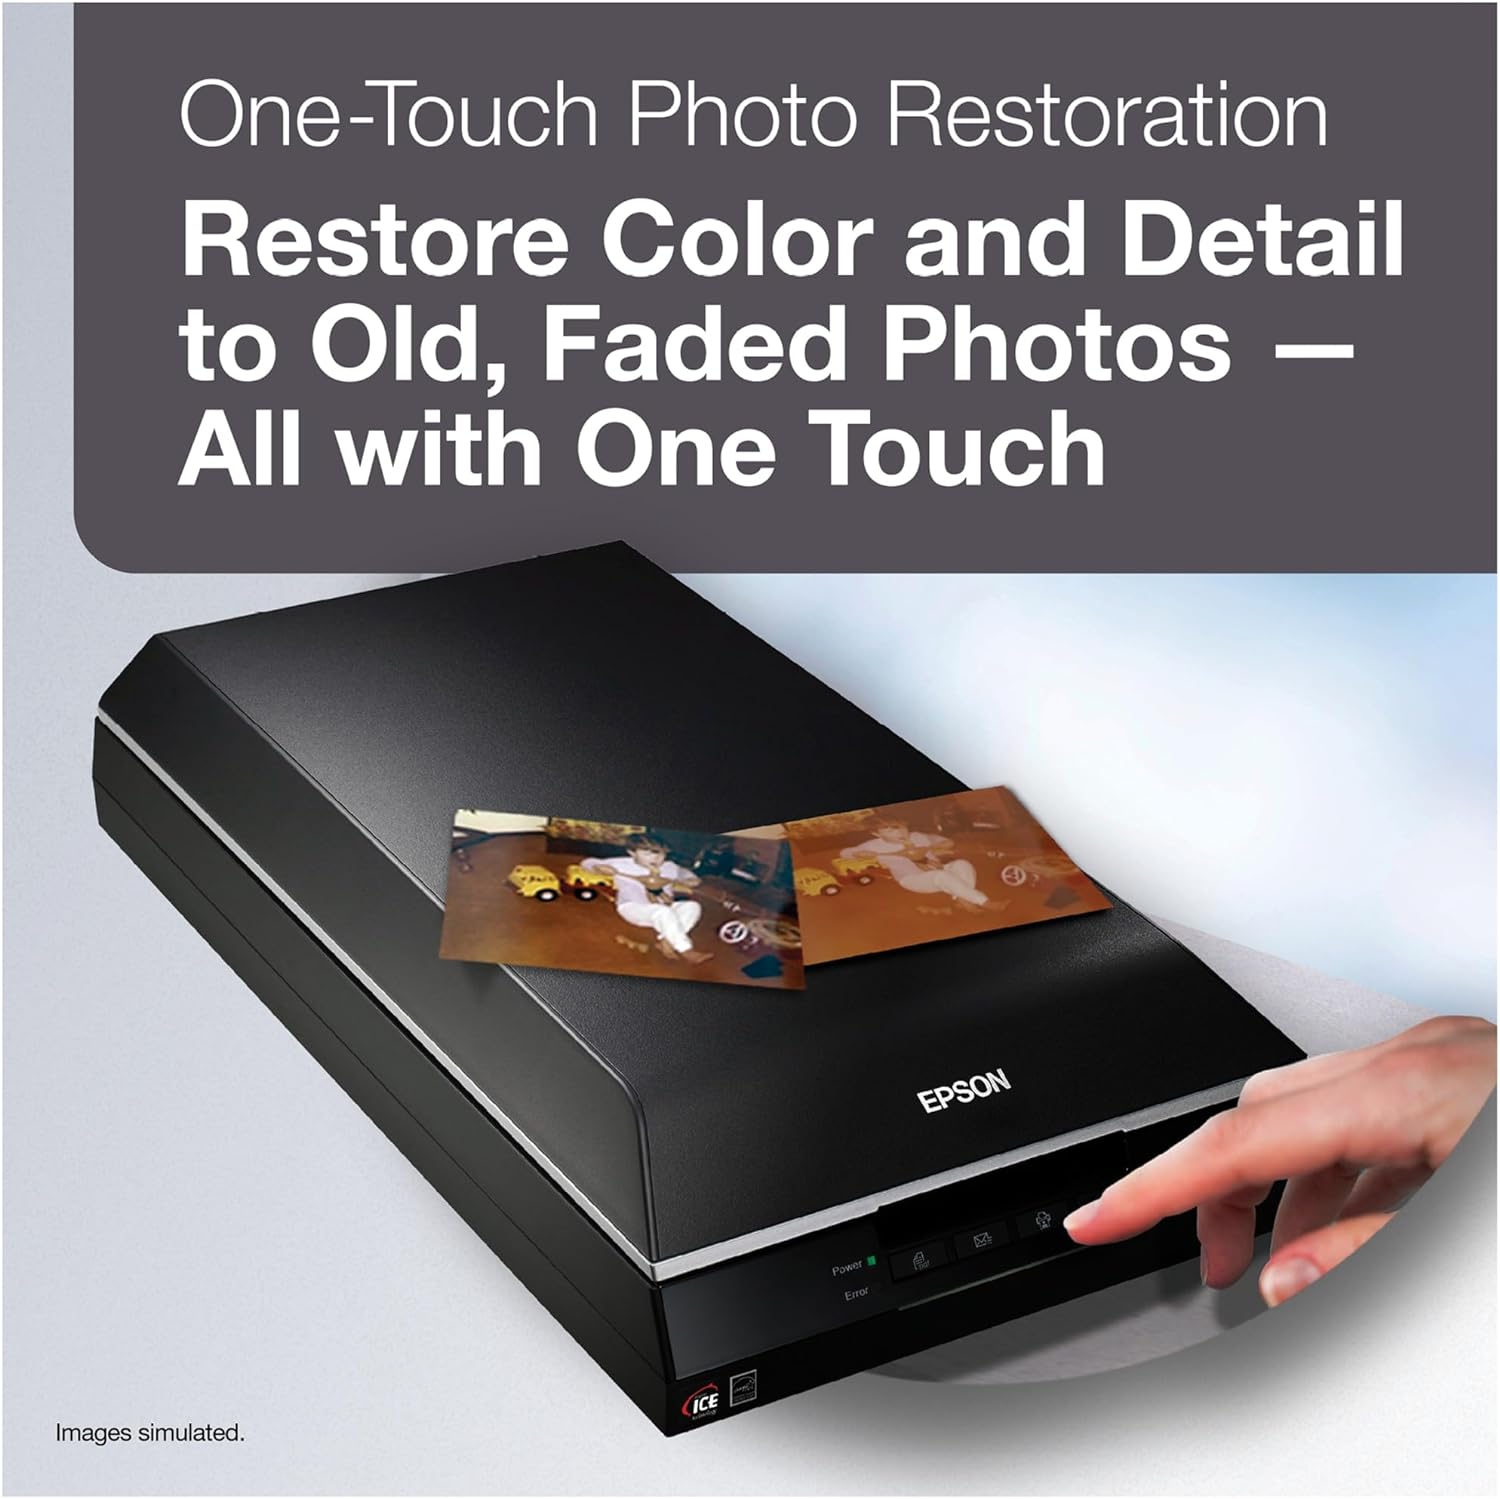
One-touch photo restoration
Easily restore color and detail to old, faded photos—all with one touch
-
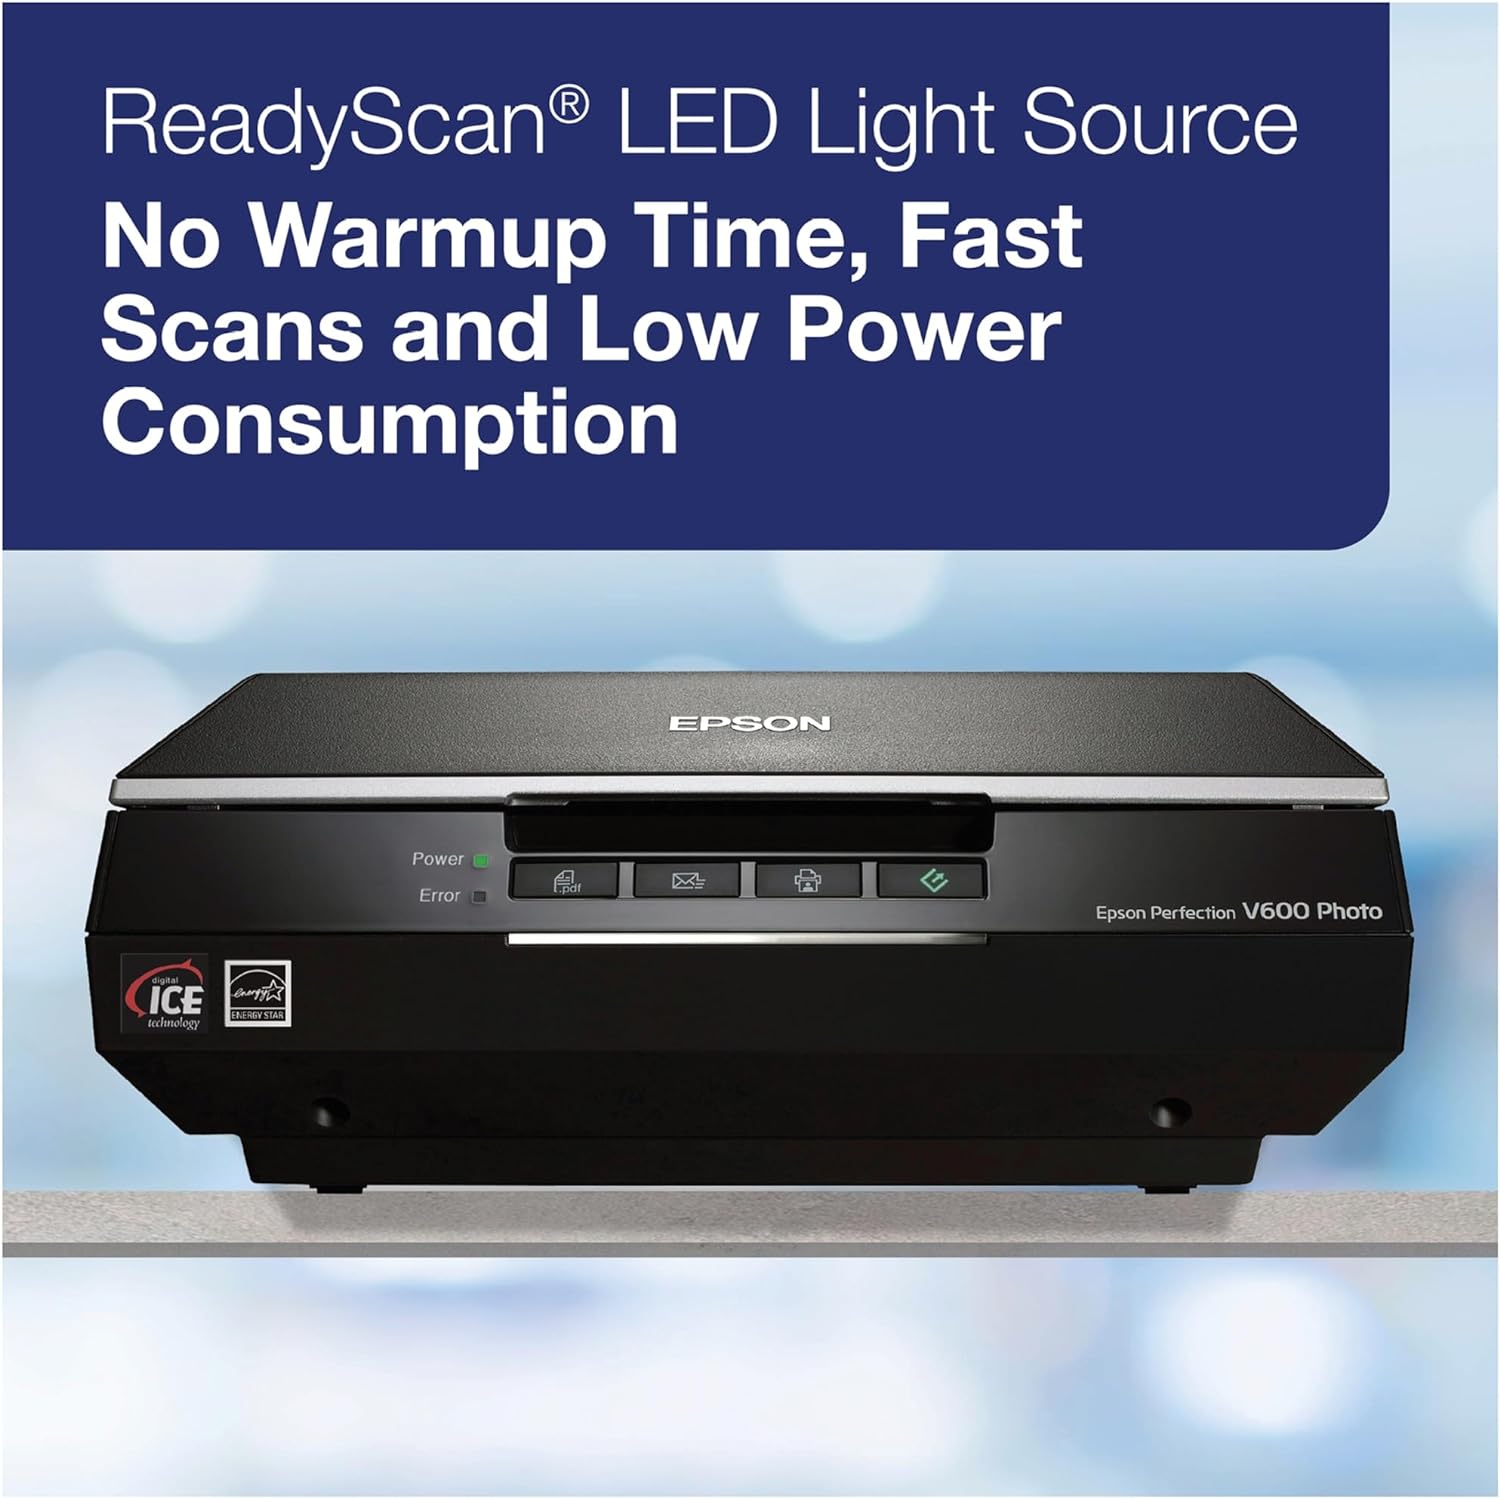
ReadyScan LED light source
No warmup time, fast scans and low power consumption


Automatically Remove Dust and Scratches
Digital ICE Technology removes many surface defects from film and prints
” data-position=”triggerHorizontal”>
Create Extraordinary Enlargements from Film
6400 dpi and a 3.4 Dmax for 35mm enlargements up to 17" x 22"
” data-position=”triggerHorizontal”>
Built-in Transparency Unit
Scan 35mm slides (4 frames), negatives (12 frames) and 6 cm x 22 cm medium-format panoramic film
” data-position=”triggerHorizontal”>
ReadyScan LED Light Source
No warmup time, fast scans and low power consumption
” data-position=”triggerHorizontal”>
One-Touch Photo Restoration
Easily restore color and detail to old, faded photos–all with one touch
” data-position=”triggerHorizontal”>
Compare Flatbed Photo Scanners

Perfection V600 Photo
|

Perfection V39
|

Perfection V850 Pro
|

12000XL Graphic Arts
|

12000XL Photo
|
|
|
Customer Reviews
|
6,744
|
4,455
|
429
|
27
|
15
|
|
Price
|
$294.99 |
$139.88 |
— |
— |
— |
|
Flatbed Optical Resolution
|
6400 dpi |
4800 dpi |
4800 dpi |
2400 dpi |
2400 dpi |
|
Film Optical Resolution
|
6400 dpi |
– |
6400 dpi |
– |
2400 dpi |
|
Dmax
|
3.4 |
– |
4.0 |
3.8 |
3.8 |
|
Flatbed Size
|
8.5″ x 11.7″ |
8.5″ x 11.7″ |
8.5″ x 11.7″ |
12.2″ x 17.2″ |
12.2″ x 17.2″ |
|
Transparency Unit Size
|
2.7″ x 9.5″ |
– |
8″ x 10″ |
Optional |
12″ x 16″ |
|
Color Restoration
|
✔ |
✔ |
✔ |
✔ |
✔ |
|
Digital ICE for Prints/Film
|
✔ |
✘ |
✔ |
✘ |
✘ |
|
Film Holders Included
|
35 mm and medium-format |
— |
35 mm, medium and large-format |
— |
35 mm, medium and large-format |
|
Optional Fluid Mount
|
✘ |
✘ |
✔ |
✘ |
✘ |
|
Connectivity
|
Hi-Speed USB 2.0 |
Hi-Speed USB 2.0 |
Hi-Speed USB 2.0 |
Hi-Speed USB 2.0 |
Hi-Speed USB 2.0 |
|
Windows/macOS Support
|
✔ |
✔ |
✔ |
✔ |
✔ |
|
TWAIN Support
|
✔ |
✔ |
✔ |
✔ |
✔ |
Specification: Epson Perfection V600 Color Photo, Image, Film, Negative & Document Scanner
|
Photos: Epson Perfection V600 Color Photo, Image, Film, Negative & Document Scanner


10 reviews for Epson Perfection V600 Color Photo, Image, Film, Negative & Document Scanner
Add a review


$301.88


Dave MillmanDave Millman –
I’ve had the Epson V600 Scanner since 2010. I compared it side-by-side with the Epson Perfection V370 Color Photo, Image, Film, Negative & Document Scanner with scan-to-cloud & 4800 x 9600 dpi (B11B207221) using the Epson software and also Vuescan by Hamrick Software.Here is the concise comparison, based on the most common scanning tasks:QUICK DOCUMENT SCAN: Both scanners handle this with one button. Both use LEDs instead of fluorescent bulbs, so there is no warm-up delay. There’s virtually no difference between them. Use the included Epson software.OCCASIONAL PHOTO SCANS: Both scanners excel at this, again with one button. No difference between them. Use the Epson SoftwareOCR: Both scanners include OCR software. Depending on your application, both do an acceptable job. Take your time, line up the pages carefully, rescan when a page has lots of errors. Neither scanner has an automatic document feeder, so you won’t be hand-feeding 100 pages without some fatigue. No difference between the scanners.BOOK/OBJECT SCANS: This is something I didn’t know I would need before getting the V600. But if the scanner does not have a hinged lid designed for objects thicker than a piece of paper, it will be a major inconvenience to scan a book or a 3D object (I’ve scanned remote controls, artwork, school projects, etc.). Both scanners have a well-designed hinged lid, and work very well with thick books.FILM SCANNING: This is where you start to see a difference between these two scanners. The V600 delivers a significantly better result than the V370 with transparencies. It’s resolution is 6400 dpi vs 4800 dpi for the V600. This makes a real and noticeable difference with film, because the original is small and you want all the resolution you can get. In addition, the V600 has a secondary infrared lamp for film scanning, which can make a significant difference for color slides and negatives because it makes dust “disappear.” The V370 does not have an IR lamp.HIGH RESOLUTION SCANNING: Many people put a bit much emphasis on scanner resolution. The fact is, if you are not scanning film or doing some type of technical work where you zoom way in to an image, you will seldom scan a full-size original at the full resolution of the scanner, because each scan will be hundreds of megabytes! The resolution of the V600 is much higher than that of the V370, which will only make a difference if you scan film or do highly-detailed work. If you don’t already know you have an application like this for the 6400 dpi of the V600, it is unlikely you will need more resolution than the 4800 dpi of the V370.EPSON SOFTWARE (included): The Epson software has gotten better with every release. The newest version for the V370 does photo stitching and direct scanning to cloud accounts, in addition to one-button scanning and photo repair. Epson gives you four modes to choose from, each with a few more controls to tweak. My daughter will not touch Vuescan (see below) because the one-click Epson software does a great job for many jobs, and the Professional mode gives access to most settings to improve your scans. Mac and Windows are both well supported.VUESCAN SUPPORT: Vuescan from Hamrick Software is an amazing third-party product that gives you significantly better control of every aspect of your scans. I’ve used it since buying the V600. I downloaded the latest release, which directly supports the V370, to do this review. However, I realized something: The included Epson software has gotten so good, casual or intermediate scanner users are unlikely to ever need Vuescan. And if you do need the extra control and features of Vuescan, you probably want the V600 scanner.This is the key finding of this comparison: If you are the kind of person who will spend many hours scanning hundreds of photos, and learning how to tweak every possible setting to get the best scan before importing it into PhotoShop for further manipulation, then you want the V600. If you are an a less technical user who doesn’t adjust digital photos in Photoshop or tweak scans in Vuescan or scan film, then you will be thrilled with the V370 with its included software. Both of these products are light years ahead of what scanners could do 10 years ago.SUMMARY: Buy the V370 unless you are a PhotoShop guru who loves to tweak, or you have a lot of highly-detailed scanning work that requires 6400 dpi resolution. The V600 will do a significantly better job on negatives or slides, but if you have lots of film to scan, look into a film scanner.Original V600 review from 2010:I got rid of my last scanner about 12 years ago. Back then, they were slow, worked poorly with slides and negatives, and the drivers caused unmitigated grief for your computer. So it was with some trepidation that I installed the V600 onto our MacBook running Snow Leopard and HP laptop running Vista.I need not have worried. The included software performed flawlessly, and the scanner creates amazing scans even when using the fully automatic settings. I have uploaded three scans, all using the automatic settings: * White horse, scanned from a print made from a digital camera * Candy scanned from objects on the scanner bed * A dog’s tail, also scanned from the the live objectAll three scans (especially the candy and dog’s tail) are courtesy of my 12-year old daughter, who is getting very creative with the V600. Epson has delivered software that makes the whole scanning experience easy while still delivering high quality results.The film scanner uses special trays (included) and a separate light source, and delivers 6400 dpi. The automatic results are decent, actually a lot better than my neighbor’s scanner that cost three times as much as this one. But for great film or negative results, grab a copy of VueScan on the web. Scanners are actually very complex animals, with color profiles a myriad of available settings (which are mostly kept under the hood of the included Epson software). If you want to tweak your results, VueScan is the best solution. It directly supports the V600, and includes profiles for dozens of different negative and transparency film stocks. The results are substantially better than what you can get with the included software.I haven’t found a flaw with this product yet. 5 stars for sheer delight.
Amazon Customer –
I bought this for our family for Christmas to digitize hundreds of rolls of film negatives mainly taken on our SLR (pre-digital days). There are many great memories we wanted to preserve: our wedding, our young children, vacations, etc. We debated sending them to a digitizing service, but we figured that would still be a lot of work for us in trying to organize all the photos in proper chronological order…obviously, it would be a lot more expensive too.Overall it has been a great experience and the scanner provides outstanding images that rival our modern digital cameras. The most important thing is to get an efficient workflow going to minimize the amount of time it takes for a large job like ours.We had a few rolls taken on our children’s cheap cameras or disposable underwater cameras. The scans of these negatives were significantly lower quality than our SLR photos. So the quality of the photos really affects the results you will get.Digital ICE is really amazing at removing dust/dirt from the negatives. It is a huge time saver over having to edit each photo with GIMP/Photoshop to remove flaws. I saw no artifacts from this process. The software’s Dust Removal option did not work well, so I would advise using Digital ICE and leave Dust Removal off. However, using the Digital ICE options more than doubles the scan time, but I find this well worth it.Before starting, do some experiments to find the optimal settings for scanning your negatives. For most of our photos we used: 2400 DPI, Unsharp mask set to Low, Digital ICE on, all other check-mark options off. When saving the photos to JPEG files we used a quality setting of 7 (equivalent to 93 in other image tools such as GIMP).We also bought a second negative tray to make things more efficient. We bought the following, which is identical to the one provided with the scanner from Epson:https://www.amazon.com/gp/product/B07WVGFP7HHere is our workflow:1. Insert negatives into the holder. Initially, we followed the directions and put them face down. But we found quite a few rolls had significant curvature that caused the negatives to touch the bottom glass. This creates newton rings that are impossible or take a lot of work to remove via an image processing program like GIMP. We did a lot of research on this and ultimately decided to put the negatives face up in the holder. We do not see any difference in image quality when doing some careful testing.2. Give a few puffs of air to both sides of the negatives to remove dust/dirt. We bought a Giottos AA1900 Rocket Blaster from Amazon, which works well. Then insert negatives on scanner glass and close.3. Hit on Epson Scan. During this minute, remove the previous negatives that just came out of the scanner and file these away.4. Hit on the preview scan pane to select all images. To undo the fact we put the negatives in upside down: Hit button, then button twice. Then hit the Digitial ICE button and Unsharp mask to Low. It is unfortunate that the software does not remember these settings.5. Double click on the first preview image and adjust the brightness/color as needed (using the 4th icon). Repeat this for each preview photo. We found that most of our negatives needed between -5 and -25 on the brightness. Some needed color tweaking, mainly adding some blue.6. Hit the thumbnail button to go back to thumbnails. Then hit . You need to think how you want to organize the photos if you have thousands of photos you are scanning. We decided on the filename: IMG_YYYY_Rollrr_nnn.jpg where YYYY is the year, rr is the roll number for that year, and nnn is photo on the roll. It is nice the software automatically increments to photo number. We had to edit some filenames later after we found some rolls out of order.7. During the 20-25 minutes it takes to scan the negatives, prepare the next set of negatives in the second negative holder. This is a big time saver.8. Now you can go away form the scanner/computer and do something else. Unfortunately, the software does not indicate with a sound when it is finished the scan. We wasted a lot of time when the prior scan was finished and we were away from the computer. So I wrote a little Python program that would look at the Scanning Progress window and play some music when it was no longer on the screen. This was a huge time saver, but unfortunately most users are not going to have the programming skills to be able to do this. So as soon as we hear the music, we return to the computer. This works great.9. Remove the negatives that have been scanned and go back to step 2.After scanning a few rolls, I then go through each image to see if any have flaws. I found that about 10% need some touch up work with GIMP, mainly to remove dust that Digital ICE could not fix properly. But these were at most 2 or 3 spots per photo. About 5% of photos need some color correction or highlight/shadow optimization in GIMP; it makes sense to try to use the Epson Scan software to get this as good as possible on the previews before scanning to avoid this post-processing work as much as possible.Overall, this is a great scanner and well worth the money and time it takes to revive old memories.
Gary –
Some background first: Over the past 40+ years I have accumulated close to 5000 35mm slides. Last year, after not looking at any of them for many years, I got the slides out, and set up the projector and screen. About 50 or so slides into my trip down memory lane, the bulb on the projector burned out. But it only took 50 slides to discover that virtually all of my slides had lost their vibrant color. I was shocked – I didn’t know this could happen. I might also mention that there doesn’t seem to be a replacement bulb available for my projector anymore!I started doing research on photo/slide scanners and came across the very strong set of reocmmendations for the Epson V600. Many of the reviews commented on the quality of its automatic slide restoration process. That really caught my attention. I decided I would take a chance with the Epson.Am I ever glad I did. The Epson scans four slides at a time. With a setting of 300 dpi (which produces an excellent quality image viewed on a 60″ high def TV screen) and only results in about a 350kb jpeg file for each picture, the Epson takes 2 minutes and 40 seconds to scan all four slides, while automatically restoring color depth and removing surface dust. The Epson includes Adobe Photoshop software so you can easily fiddle with slides that were over- or under-exposed, or might have suffered some visible damage. You have the option of saving your slide scans in other formats, such as tiff, which might be better if you want to do a lot of editing to your slides.Scanning my entire slide collection will probably take me months, but I believe I will be able to save my entire collection, all fully restored to original color. For a lifetime of memories, it seems well worth the effort. The great thing is that the automatically restored image from the Epson scanner almost never requires any other adjustment; this is a huge time saver.The Epson operation is pretty intuitive – you won’t need to study instructions. The quick start guide gives you all the information you need. Do pay some attention to telling the scanner what file names you want to use and where you want them stored on your computer. You can create a folder for a country you visited – say, England, for example – and then scan your hundred slides of England. The Epson will number the slides sequentially as “England001, England002, etc.” It is easy to organize slides in a logical fashion. Once you set up the folder structure, you won’t have to change any settings in the Epson until you want to start another folder, such as, say “France”.The Epson does a great job scanning photos and negatives as well, but you are limited to scanning photos no bigger than the scan plate. But anything 8 x 10 or under will never be a problem. Of course, you can also use much higher quality scan rates than I am using (up to 9600 dpi) but this does increase the scan time and file size. Probably the only reason to use a very high scan rate would be if you plan to create super-sized blow-up photos from an image.I can’t recommend this scanner more. I thought my slides were a lost cause and now I can restore them all. I can also eventually throw out four, three-cubic foot boxes filled with slide trays, my projector with its broken lamp, and the screen. And then I can watch all of my slides easily on my TV anytime I want. And all my old pastel slides will eventually be back to their full technicolor glory.
John –
So far, I am well pleased with this product. The color correction software has removed most of the yellow cast on pictures from the early 1900s and the picture quality looks as good or better than the originals since the scanned images are not as yellow and are clear and brighter than the originals. I used 300 dpi resoluton for the B&W documents and 1200 dpi resolution for the B&W photos. The documents scan quickly, maybe less than 15 seconds and the photos are taking around 3 minutes. The 1200 dpi resolution lets me enlarge the old images and keep a nice clear image so I think it is well worth the additional scan time. I will post more here as I get into the color photos. So far, I have used the fully automated scan option with very good results. And this has been a snap to do. I am very pleased, as I said.8-27-2001 Edit: I have scanned in several hundred B&W photos following the suggested spacing, of multiple photos on the scanner bed, of at least 0.80 inch. This worked well until last night when the multiple images were not scanned into separate .jpeg files rather into a single .jpeg file. I entered a problem report on the Epson Support Website and received the following response:I am sorry to hear that you are now unable to scan multiple photos at a time. The following information should help resolve the issue.Launch Epson Scan (if applicable).Under Home or Professional mode, please click on Configuration at the bottom part of Epson Scan.On the Configuration window, click on the Other tab, and click on Reset All.Confirm restoring of Epson Scan. Then launch or open it up again then try scanning.If the issue persists, you may need to reinstall Epson Scan.I performed all of these steps including a reinstall of the Epson Scan software and the problem persists. I have resubmitted a new problem report as they suggested. I will edit this review as I learn more and try their new recommendations.09/02/11 Edit: I received this email from tech support:Thank you for contacting Epson regarding your Epson Perfection V600 Photo. It is my pleasure to respond to your inquiry. My apologies for the trouble you are having with your Epson Scanner. If you have checked all of your settings in the software and confirmed you have the thumbnail option selected, and you confirm that you images are separated as per the guidelines you may have a hardware issue with your scanner. Please provide us with a serial number so we can check your warranty status. If your scanner is still within its one-year replacement warranty from the original date of purchase please contact the Epson Connection at 562-276-4382 when you are with your computer and scanner setup. The representative will assist you with a brief telephone diagnostic to confirm the need for replacement.The next day I booted the computer and, before calling Epson tech support, thought I would give the Full Auto Mode one more try. This time the B&W photos scanned properly into separate .jpeg files. I decided to call tech support, as I couldn’t figure out how to select the Thumbnail Option, and just to be sure that this was not an intermittent problem. The email stated that they would have me run some diagnostic tests and I thought that this sounded like a good idea. However all that the tech support guy was able to suggest was to go into Professional Mode, select Preview and on the screen that appears click on the Thumbnail Tab. Then he suggested, obviously, to do the scans from Professional Mode. Since I have better results with scanning B&W photos in Full Automatic Mode, I will stay with that mode unless I have more problems. I will keep posting to this review as I get into color scanning and discover things. I am keeping my settings recorded in a Word file and will post these here when I arrive at the settings I am happy with. I plan to look and see what exists on the Epson site in the way of a blog on their individual products.
Magazine Guy –
Don’t get too worked up by the negative reviews calling the Epson Scan software “junk.” It isn’t. I read enough of the other reviews to convince me to download a copy of Vuescan and try it out right away. True, Vuescan has a lot of film profiles that should be more accurate than the limited number Epson uses, but the trouble with Vuescan and this V600 scanner–in my experience–is that the frames for batch scanning a group of negatives were not accurate, and it was more than a little confusing, if not impossible, to change the frames around. This feature of Vuescan is very confusing your first couple of times around, and I lost patience and shut the program down. Then, thinking I’d better try the Epson software before considering returning the scanner, I opened Epson Scan. I went straight to “Professional” mode, checked out all the parameters they allow adjustment to, selected what I wanted, and clicked “Preview.” This is scanning two strips of negatives, mind you. When the preview came up, it had all twelve frames boxed in their own boxes, all basically color-corrected and ready for action. You select a check-box to pick which frames you want to scan, and click on each separate frame to diddle with it–like rotate it to the proper orientation, or change the exposure, whatever. Then just hit “Scan” and walk away. When it finishes you have all your selected scans in your “My Pictures” folder or wherever you want them, named whatever you want with “001”, “002” and so-on appended to the name. It is easy as pie, and the quality is on par with any scanner I’ve used so far. Speed? For a 2400 dpi neg scan much less than a minute per scan. Now some caveats. I’m not running Digital ICE, not doing any kind of sharpening, nothing. All I want is a raw scan; all the fiddling you want to do is better done afterwards in Photoshop or Photoshop Elements, it does a much better job. If your negatives need all kinds of cleaning, or if they’re all scratched up and require a lot of correcting in the scan, you screwed up. Take care of your negs and slides, keep them clean, and you won’t have problems scanning them. You can clean them with a quick wipe with a lint-free cloth with a little rubber cement thinner on it–just don’t use anything water-based on negs and slides. Secondly, just for grins I loaded a magazine page into the scanner and tried out the OCR software, ABBYY. They claim that it can scan and convert printed text into type. If you’ve had any experience with OCR software, you probably take that claim with a large grain of salt, like I did. But one quick scan–greyscale, 400 dpi–and the page was up on the screen. Pull it into Microsoft Word and it was 100 percent accurate, every word spelled correctly, even the closest font was selected for the text. An incredible job, in my opinion. What’s my qualifications? I’ve been working with images my whole professional life. 40 years of photography or more, working with digital images since they first came out. I’ve owned a dozen different flatbed scanners and a couple of film scanners. You might be able to get better results from a more expensive scanner, but for the money this Epson V600 is tough to beat. Highly recommended. And give the included software a chance, you’ll probably like it just fine.
FuzzyLogician –
I needed a flatbed scanner that did negatives, positives and slides.☼ Scanner is Epson certified refurbished.► Power and USB cables included► Epson Drivers work with Windows11 had no issues, ***► Has keyed stationary template for 35mm slides for placement on deck► Has keyed stationary template for 35mm film strips for placement on main deck► Has keyed stationary template for working with curled film as well for placement on main deck► Scanner has removable white platin for top desk scanning, remove for slide/film scanning►Top deck in lid center has small scanner/backlight to work with film/slides (saves lots of time and focuses on only the areas you need to scan and forgets the rest when not needed►Scanner smart software knows and tells you when to remove the upper deck platin sliding insert for film scanning▬▬☼ What I didn’t know why buying scanner►It included between Epson and German company LaserSoft is SilverFast SE software 8 and free upgrade to version 9 (Downloadable – would highly encourage to get this even if you don’t have the EPSON, they cover many scanners and profiles and have even better software available if needed – I’m impressed with them).• Software has IR scanning capabilities to remove dust and scratches keeping and interpolated 3600 resolutions. Expect (300-600dpi actual).• Even with interpolated 3600 I was astounded how well it worked and clear scans were on old slides that have been in transit tens of thousands of miles across Asia and the US over a period of 50+ years, including heat and humidity.• SilverFast 9 auto detects the slide and film frames for scanning (you can manually adjust settings if it is ever off and then manually re-frame for the scans.”• SilverFast 9 has manual modes and “FlightPlan” modes where the latter is pre-scheduled tasks that you can tailor as needed. This FlightPlan speeds up production scans, correction and saves handling 4 slides at a time.• At highest quality setting files size is around 40megs a slide / frame fir 35mm. You can adjust to your needs, however mine are for preservation /, restoration as needed.• Last but certainly not the least, SilverFast 9 has customizable batch handling and naming.▬▬☼Generally would not have considered Epson but these factors came into play prompting me to evaluate what Epson had to offer:• Good Film and Slide scanners are hard to come by and good ones get expensive and don’t offer the price point balance for small projects (under 5000 slides) I did some research on what people have used now and in the past.• ***After my poor experience with Canon and their LIDE 80 scanner drivers not working with Windows 10/11 (lack of support from Canon’s part to keep up with windows which was irritating to deal with them to buy another one of their scanners). The LIDE 80 scanner worked fine with latest Ubuntu Linux, however, I needed a windows-based solution for lots of things.• No good reviews customer or otherwise on actual film scanners out there.• Auto-feeder/loader scanners were over five grand and not justifiable.• An affordable solution for small project needed. As Epson refurbished, I was fortunate to find this at half the going rate for this type of scanner.▬▬A summary, I’m more than pleased how this worked out for me and the task.This also demonstrates that flatbed scanners are NOT dead and still have uses IF their perspective companies will keep them updated or Windows natively supported.
M1K3 FR0M D3TR01T –
11th Day Update: all 5400 slide transparencies (35mm mounted slides) have been scanned (at 2400dpi) and burned to DVDs. That was with only selective use of Color Restoration, which doesn’t add anytime to the scan. We would look at each set of 4 preview images and click and highlight the ones we wanted to color restore (click on the slide, do NOT click on the checkbox…leave the checkbox on each preview CHECKED ON…that’s what lets the scanner know you want to scan all 4 slides that you just previewed).Super huge 5,400 slide project DONE for $199 + blank DVDs and a blank usb thumbdrive for backup. We also sprang for an external hard drive and docking station for a super backup. Not bad and we still have a great scanner. Much cheaper than paying a service to do it. Less than 2 weeks worth of work!Background: BFA in Art with concentration in Darkroom Photography; Own my own darkroom for 25 years; Decade as an Imaging Specialist/Scanner Operator (you can skip the next few paragraphs and get to the settings which worked well for us while scanning a bunch of old slides).I was a digital imaging specialist for 10 years at Thomson Learning/Gale Research. Every day for a decade, 8 hours a day I used PhotoShop 3.0+, flatbed scanners, image setters and even a Nikon Coolscan slide scanner with an automatic slide-feeder. As I recall the slide feeder could hold about 40 mounted slides and took about 8 minutes per slide to scan. It would jam once or twice per day. I would use the digitized images in textbooks, dictionaries and online resources/databases we published and charged universities and public libraries for. Meaning: I was in a professional publishing environment. One of my degrees is in Fine Arts with a concentration in dark room photography. I still have (but don’t use anymore) an actual photographic darkroom. I’ve personally hand-developed thousands of rolls of transparency (slide) film.CLEANING OLD FILM/SLIDESSo first to correct some erroneous information in a previous review: You CAN wash old film and slides in water. How do you think we washed all the developer/stop bath/fixer off the film once we were done developing it? We used WATER!!! And not fancy distilled water, just regular tap water. Then we hung the film strips from clips in the ceiling until they drip-dried, once dried we would take scissors and cut the entire roll down to manageable strips (or we cut the transparency film down to each frame and popped them into slide holders). Rubbing alcohol will leave streaks and dry spots. A wetting agent could be added to the final rinse water (two drops of rinse agent to a gallon of tap water). That would TOTALLY eliminate dry spots. Of course distilled water could be used NOW since you probably don’t have a photo-store near you to buy wetting solution. Distilled water is 99 cents a gallon at the store by me.Guess what the final rinse was when we developed paper prints (color and black and white)…you guessed it! Plain old tap water!!! If you have a paper photography that was made in the 1950s or later you can POSSIBLY remove the stains by soaking it in water! Basically, as long as it’s not some glass negative tin-type silver salt thing from the Civil War Era water won’t hurt anything!Water makes film and paper VERY SOFT and EASILY SCRATCHED until it dries again.However, as long is your film is in reasonable shape the best bet is to just use an air duster can to blow off the dust. Also blow off the dust from this scanner every once in a while too.RATIONALE FOR PURCHASING THE EPSON V600While I still have a Umax Powerlook III which was probably around $1700 new, it only does one scan at a time. I wanted to set up a new, easy scan station for my father to scan his old slides: 54 slide projector carousels (round thingies) filled with a maximum 100 slides each. Using this scanner at 2400dpi and saving as JPG at 1 compression (no/least compression) at 48-bit color results in files that are a little over 4MB each closed and abou 10MB open. This scanner can go up to a whopping 128,000dpi but that’s overkill for our current purposes: see our old photos and occasionally sending one off to an online printing service for 16×20″ print.SETTINGS FOR SLIDE SCANNINGI installed the CD software, then plugged in the machine, and finally I turned it on with the ON/OFF button HIDDEN on the right side of the machine. The online manual and the manual on the CD say to use the box with a diagonal arrow to turn it on but that’s WRONG, WRONG, WRONG! Contrary to what the instructions say there IS an on/off button. The quick start guide included is correct in this respect.So, for decent slide scans here is a nice setting list:Mode = ProfessionalDocument type = Positive filmImage Type = 48-bitResolution = 2400 dpiCHECK the unsharp mask box to turn it on, set level to LOWCHECK the Color Restoration box to turn it on.Nothing else checked.Click preview, select and flip any upside-down slides with the optionsClick Scan and sit back and wait while all 4 slides are scanned (a little under 4 minutes to scan and auto-name and auto-save).ACTUAL PROJECT:Each slide takes 1 minute to scan, auto-name and auto-save.54 boxes of slides x 100 slides each = 5400 slides.That’s 5400 minutes, which equals 90 hours. That’s about two-and-a-half-weeks worth of work at my old jo, working 8 hour days. Totally doable!!!!Each scan closed on disc is less than 5MB, so we’ll round up to 5MB.5,400 x 5MB = 27,000MB, which is 27GB.WOW! 27GB will totally fit on a cheap 64GB thumb drive!It will also fit on about 7 DVD-R discs. A spindle of 100 DVD-Rs is like $20, lol!So: get this; get a can of spray duster; some distilled water if your originals are too gross; a 64GB thumb drive and some DVD-R + blank discs.WHY THIS?Some other “scanners” are cheaper and claim to scan in a single second. They are cheap webcams stuck in a cheap plastic box that take a crappy photograph of you slide. You would get better results taping your slides/negatives to a window and snapping a picture of them with your cellphone!!!! Seriously awful quality. Plus, this Epson also scans paper photographic prints because it’s a flatbed.Yes, at about 1 minute per slide it’s a little slower (at 2400dpi) but you can save a little time and scan at 1200dpi, or even go down to 100dpi, lol. Depends what you’re using them for. Online/facebook then 100-300dpi is fine. Using your photograph to print a HUGE poster: select 128,000dpi and knock their socks off. Plus everything in between. Basically it’s $50-$100 for something that’s almost guaranteed to disappoint; or $200 for this thing which is awesome.A minute per slide is a lot slower than 1 second per slide. I’d rather spend two weeks getting 5,400 great scans then spend 5 hours getting crappy scans that look terrible and I’ll end up deleting.CONSThis thing is huge (because it can scan actual sheets of paper too).It’s heavy (really heavy and good quality).It has a weird spring on the top: it tries to slam upward when opening and slam downward when closing: BE CAREFUL!On/Off button is not mentioned in two of three manuals. It’s on the right side, near bottom, lol.WHAT DIDN’T WORK WELL (FOR US) AND WHAT DIDFirst off, use the professional mode for slides. The automatic easy mode has drawbacks: it only allows 1200dpi scans at the highest setting; even though it’s only 1200dpi it seems to take longer than the professional mode at 2400dpi; even though in the manual it says you can skip the preview…it actually does one preview at a time and shows that to you while it scans, which means the preview portion takes FOUR times as long. Also, when you select the color restoration option: the little preview is color restored, but the scan isn’t! It’s a weird flaw in the software. So: it takes 2x-4x as long and doesn’t actually apply color restoration to the scan that is autosaved to your computer. Another problem is that the unsharp mask is NOT an option in the automatic mode! Thus: if you want to scan, color restore and sharpen you have to use the professional mode (and re-check the color restoration box after selection “all” 4 previews with the blue frame highlighting them AFTER EVERY PREVIEW!!!!). Use the professional mode.48-bit color is noticeably better than 24-bit. Not just nit-picking, it’s easily noticed. 24-bit results in flat blocks of color like 1990s over-compressed JPGS, lol. Make sure to use the 48-bit option.On principle I NEVER enable ICE/dust correction because it does a couple things: slows down the scanning/saving process; and it also can do weird things to some photos. I’ve found it will do well on a bunch of photos, but then do weird things to the glint in peoples’ eyes in portraits and makes then look crazy. We’re happier with the sprayduster can.I fiddled a little with the grain removal setting, but it just kind of blurred my test slides. Yep: if you blur a photo it’s hard to see the grain. I leave the grain removal OFF. You can always blur your scans later if you wanted to.Red EYE reduction: I suppose if you have like 500 slides of people with red eye (reflection of on-camera flash unit’s light) then MAYBE you could use this, but I leave it off because I have no idea what it might randomly decide to do to normal portraits or even photos with no people in them. Why chance it?Unsharp mask: you can always sharpen later; but if something is oversharpened it’s harder to fix. Sharpening bumps up the color value between two areas of abutting colors (heavier outlines). The sharpening feature IS really nice, so I set it to the “LOW” setting. A good safe bet.Color restoration: WOW! Professionally I would never use this in the past, but this just works great with our Kodak EktaChrome and KodaChrome slides from the 1970s-1990s. I mean the benefit of having this checkbox CHECKED ON is amazing! Something that might take me 10 minutes to get in PhotoShop is just instant. It does wonders even on slides I thought were totally fine. USE IT!There are other settings were you want to: UNcheck the write over files with the same name (why would you want to overwrite your previous scans? An accident waiting to happen). I think it defaults to name by sequential number (1, 2, 3…). I changed the default name from “Img” to “Slide” So they come out “Slide001” “Slide002” and on and on.File type: I selected JPG with no compression (1 out of 100). You could also select TIFF. Honestly, the JPG is nice. When I was a professional (paid) scanner I would save as TIFF. It was lossless (doesn’t throw out color information). JPEG has come a long way, and if you set it at no/low compression you won’t have problems. TIFFs are still a tad bigger, but if you’re scanning once and then throwing away your slides then scan huge and save as TIFF for that once in a lifetime chance of archiving. Honestly, the JPEG is totally fine: at a 1 setting you don’t see any jpeg blocky digital artifacts-even when zoomed in. JPEGS also (still) seem to play better when most stuff online/social/tv set/BluRay player/etc. It really doesn’t matter too much TIFF vs JPG (as long as you set the JPG to 1 No compression). UNFORTUNATELY it defaults to some default compression setting closer to 100 which WILL LOOK AWFUL, lol. Set it to 1 and then forget it. You’re pics will look great. Still worried? Then set it to save as TIFF files and you’ll just have to burn a few more DVDs on a large project–no biggie, DVDs are cheap these days. Back in my publishing days it was always: TIFF = Files sent to book printers and files sent to archive CDs ; JPGS for online databases and educational CD-ROMS. It used to REALLY matter which you chose when, but now not so much because you can basically turn off the JPG’s compression. Then it basically acts like a TIFF, but still works easily online/TV set viewing/etc.In fact, setting the bit-rate on this scanner down to only 24-bit results in blocks of flat color-just like over-compressed jpgs looked like in the 1990s! That’s why I said to use 48-bit.Somewhere in the advanced settings option when you first open Epson Scan you can also uncheck the “include color profiles” box. Unless you’re sending your files to a professional printing press that needs specific color profiles THIS JUST BLOATS THE SIZE OF EACH OF YOUR SCANS! I don’t care about LAB COLOR vs CMYK vs Srgb ICC profiles and when I was a professional our printers (and by printers I mean the humans who ran huge color printing presses that are about 40′ long) would set their prepress to strip out/ignore any color profiles accidentally left attached to image files we sent them…because THEY wanted to control the color, not some random file that nobody on our end looked at or modified or fixed or cared about. UNLESS YOU’RE A PROFESSIONAL PHOTOGRAPHER SENDING SCANS TO A COLOR PRINT PUBLICATION THAT REQUIRES YOU TO SEND ALONG COLOR PROFILES uncheck the box and save space on your computer. Even if you sent a scan to go on the cover of National Geographic I have a feeling they’d override your profile settings when they went to print the magazine.For slides use a light table to flop them down on and arrange them. Also a lamp is good for helping to see which is the shiny side and which is the dull emulsion side with raised lines on it. Emulsion side goes facing the ceiling. If you don’t have a lightbox just stick a fluorescent lamp bulb under a clear tuppeware container or something to make one.I take four slides out, have my thumb and index finger hold them by the edges with space in between and that allows me to dustspray between all four at the same time. Fast and easy! Take time to arrange your desk and work area and you can shave DAYS off your project completion time.WORKFLOWEach box of 100 slides gets a new folder on the desktop. It is named with whatever is on the spine of the box of old slides.Turn on compute and scanner.Click on Epson ScanSelect “Professional” and “Current Settings”2400dpiCheck color restoration box onCheck unsharp max on / MediumDust spray and put in 4 slides.Click PreviewClick on any of the 4 previews (NOT the little checkboxes) and they will be highlighted with a blue frame. Use the “E” rotate button to rotate any highlighted previews.****VERY IMPORTANT STEP RIGHT HERE: Click the “ALL” button the highlight all four previews with blue frames and then click “RESTORE COLOR CHECKBOX TO ON”/ (The color restoration feature shuts itself off after every preview, and if you turn it back on it only applies to the previews with blue frames around them!). This is for “pros” who only color restore 1 out of every 4 slides or whatever.Click “Scan”.Change 4 slides.Repeat a 193 times…once you get 4GB worth then save to DVDs, drag and copy to thumbdrive and drag and copy to external hd.Delete scans off computer.Repeat 7 more times.Pop the cork on some champagne…you’re done! Actually, you’ll probably want to be drinking throughout the entire project because scanning is a dull, dull process. That’s why I became a librarian. Yes, being a librarian is way more exciting than being a scanner operator. LOL!Save to DVDs.Save to USB Thumb drive.Save to an external hard drive (1 Terabyte for $49) using an external hard drive plug-n-play docking station ($20).Store the slides in a cool, dark place.Put a couple thumb drives in different spots.Put DVD copies in different places.Have yet another thumbdrive to plug into our TV to view the slides! Many BluRay players also accept USB thumb drives (or just pop the DVDs you burned into it and view photos).3 Different archive media (USB Thumbdrive, DVD-R +, External Hard Drive)…plus the copies on the desktop computer this scanner is plugged into.SHINY SIDE GOES UP for slides (dull emulsion side down).For a little more money, and a bit more time you’ll have USEABLE FANTASTIC scans.My father and I both researched this slide project. He is a film/darkroom photographer how was an automotive engineer and I was a digital imaging specialist from 1997 -2007 and am now a librarian. It took him a couple days and he favored the Epson v850 for around $1000. I researched for 15 minutes and actually ordered this V600 (for around $200). LOL. It just makes sense.Go look at the photos people post as examples in the reviews for the Wolverine and Jumble units: I can’t even tell what some of the pictures are of! Let alone gauge their quality of digitization.If you’ve got the time and money for this machine you won’t be disappointed with the results.Computer (we have a 2/3 year old Dell with i5 core processor and Windows 10, regular non-solid state hard drive)This ScannerDust-off SprayerUSB Thumbdrive (archive 1)Blank DVDs (archive 2 or more if you burn multiple copies to send to various relatives)External HD (archive 3)Time: 1 minute per slideThis thing is heavier than my 25 year old Umax PowerLook III scanner which was used in by my at my job in a multi-million dollar publishing empire. They of course laid-off everyone and sent the work to China/India. They DID sell me my computer and the Umax cheap though! I don’t know who got to take home the Nikon CoolScan slide scanner (w/auto-feeder), LOL!If you want a simple solution with GREAT quality and TONS of user changeable settings (but also simple settings too) then GET THIS!!!!Do you have only a month to scan 50,000 slides? Well, then contract a vendor to do them for 60 cents per slide and then sell you an external hard drive with your scans on it…plus shipping…plus expedited service…plus insurance which will give you a few dollars if the shipper looses all your slides so instead of your photos you’ll have like $300 and the horror of loosing priceless, irreplaceable pictures.By the way: for my 5,400 slides it would cost at least $3,240 to have them scanned (plus shipping, plus hard drive they return the scans on, etc.).For that much money I could: buy this Epson v600 and pay friend, young relative, random weirdo off CraigsList,college student, neighbor $3000 to do the actual scanning for me!If anything I gave you: a template to plan your project/setup/costs & some easy start-up settings to get great slide scans. I hope this helps.By the way, this thing comes in a HUGE box. Everyone thought I bought a new TV.UPDATE: It’s the second day of ownership, and even with our time spent testing settings, setting up a light box, unpacking and dusting off 54 boxes of 100-slide carousel wheels we managed to scan 2 entire boxes out of the 54! Not bad at all! It’s going to snow tomorrow, so that’ll mean we’ll probably get another 2 boxes done. So, casually in about a month our huge archive will be completely scanned. We already popped some of the scans onto a USB and plugged it into a BluRay player: SO COOL SEEING OUR OLD PHOTOS!!!Don’t waste anymore time shopping for the cheaper scanners: THIS IS THE ONE YOU WANT!The ONLY THING THAT SUCKS ABOUT IT IS: after every 4 slide batch is previewed the “Color Restoration” box UNchecks itself. So you have to select all four previews and ONLY THEN click to check the color restoration box, and then scan. However that takes about 2 seconds and is a LOT faster than going into PhotoShop and trying to color correct them. I can spend 5-15 minutes trying to color correct an RGB color image, and even longer for a CMYK image for print (textbook, magazine, book cover, etc.). After you do a few dozen you won’t even have to think: your hand will just click ALL and Color Correct and SCAN. Muscle memory.The other thing that sucked was the “hidden” power button that was misidentified in two of the three manuals (online, on CD, printed startup guide).Good luck, have fun, spend a day or two scanning and rescanning a few documents to get the perfect settings and physical workflow that works for you!-Mike from Detroit
A reader –
I finally figured it out….. MAC (Mojave), individual 35mm slides and “Epson Scan 2 Utility” work great!However, like so many others have said……..it was a SUPER painful experience figuring this out. Took the better part of an entire day.I went to:Epson – Home – SUPPORT – SCANNERS – PERFECTION SERIES – Epson Perfection V600 PhotoIt automatically detected my operating system, MacOS 10.14.xxx (Maverick) and displayed the correct download for me. Downloaded it and I am good to go.I had tried so many other things throughout the day that I have no idea if one of them was a necessary step for this “auto detect” to work. One of the things I had done was, at the suggestion of one of the other reviewers, gone to the little apple in the top left hand corner of the screen, clicked on it, then “Systems and Preferences”, found the “Printers and Scanners” and added the Epson V600 scanner. I couldn’t see that it was added in the drop-down window until I scrolled down for it to appear at the bottom of the list. I think the Epson V600 needed to be connected to the Mac, and turned on, for this to happen but am not sure.ALSO…..if you are scanning individual 35mm slides….the scanning head for this is in the lid of the V600 not the base. AND, as you will see it is a relatively narrow window running up the middle of the copying area. It does not cover the whole 8×10 inch glass area. SO;1) Open the lid and remove the white panel in the lid that covers the lid-scanning-head.2) Place the black plastic holder which positions your slides with the “C” tab placed in the “C” depression or slot in the scanner base. This will position your slides down the center of the scanning area.3) The Epson “Scan 2 Utility” software, after it was loaded, shows up in the “Applications” button on the edge of your screen in an “Epson” folder which in fact looks like a blue folder. Click on the Epson Blue folder icon and then click on the “Epson Scan 2” icon.4) I am using the following settings: > Scan Settings: AFTER you have selected all the options you want, come back to “Scan Settings” and “Save Current Settings” you will need to name the group of setting so you can save and identify what they are. Of course you can have more than one for various needs. > Mode: Photo >>> Main Settings <<< >Document Source: Transparency Unit (that black plastic positioner you place on the glass) >Document Type: Color Positive …… if it is slides >Image type: 48-bit >Resolution: 6400dpi (this is the highest that I could get it to work. Takes about a minute per slide) >Scanning Quality: High>>>>> Advanced Settings<<<<<< >Unsharp: Low ( another reviewer, much more knowledgeable than I, suggested Low or Off, you will need to decide for yourself.) >Color Restoration: ON .. super handy to automatically make old slides look quite nice. > Everything else OFF.REMEMBER to go back to “Scan Settings” and Save Current Settings …. give these a name so you will recognize them and can choose them again…..or you will have to start all over again next time. I realize there are a bunch of steps missing but since this was largely a hit-or-miss process for me I don’t feel qualified to provide the definitive guide for how to make this work. None the less, I hope this will be helpful. The bottom line is that once you get this to work, the Epson-provided “Scan 2 Utility” actually works quite easily. No need to buy or try to use a third party software. Which is a good thing because I had a lot of difficulty getting the free demo software to download and once I did, the one I got was WAY too complicated for me. The Epson “Scan 2” is just right for an amateur like me. It automatically scans all four slides in the positioner and downloads them to the file you setup for them. A REALLY long process but four at a time is better than one at a time.Good luck!!
C –
So far I have used this scanner to digitize my photo collection from very old family (ancestral) photos and my fathers letters and other things from WWII. Very pleased with the interface, ease of use, quickness of the scan, clean images. I use Photoshop to work further on the digitizing process, and the Epsom fully integrates with that process.I am an artist and needed a scanner for my artwork and related stuff. Wish I could afford a much larger format but this will do nicely.
jnaki –
hello, since we were ready to do our color slides to pc process, we needed a simple, but elegant looking dedicated scanner. the epson v600 was rated very high by most non amazon sites and within amazon’s reviews,..excellent. this is just what we needed, it looks great, doesn’t take up a lot of space, and the set up within my home network was simple. with a few color ektachrome, kodachrome, fujicolor slides for a test, i ran off a few practice runs, i do not know how it does it, but the color differences in all of the test slides was difficult as the mix was very eclectic. colorful motorcycles, ocean scenes, wild painted cars, people, and one ocean sunset with clouds. this epson v600 scanned each one of the four in the tray and transferred it to my pc with ease. the color reproduction was very clear and concise. when the epson was finished scanning the set of four, it simply put them in the direct folder i had designated for the project. it did not take very long to do and since i have some spare time, i can scan when i want to do the job, leave it for awhile, then pick up where i left off. the slides will be scanned onto a spare 1tb external hard drive i purchased from amazon and will be hooked up to my network via usb. the drive is large enough to store tons of stuff, but small enough to put in a safe deposit box. epson made a great product, amazon delivers again….update: i recently scanned some color slides from 1967, 1971, and 1973. they were taken with a great 35mm camera and fast lens. the images now on my computer look as if i was back in those days actually setting up the shots. crystal clear and a true an image as i have ever seen. just make sure you blow off any dust particles that may have found its way onto the slides. i cannot be more excited to go through all of the slides as i am converting them to my computer. epson quality is what i read all of the time, somewhere, well, here it is in the present. thanks for a great product and service.update two: i have been using the scanner for about a month, now. so far, over 200 slides. several things popped up that you should know: when the scanner is turned on, sometimes the epson scan screen comes on. make sure that the setting is for “full auto mode” if you want the machine to scan the 4 individual slides or film strips. otherwise, any other settings will scan the complete tray, slides and anything else you have on the full glass plate. you probably will have to use your photo program to look for random lint and other stuff that gets on the image. i cleaned each slide and somehow, the old slides still had dust flecks in random areas. i had a few beach shots and there were more flecks than usual. the photo program “repair tool” took care of the flecks. now the 40 year old slides look like i just took them yesterday. the color images usually did not take much to get them to near perfect color resolution. but, yrmv…update march 08, 2013: for all of the time obsessed fanatics: this epson v600 scanner does one ektachrome color positive slide from the 60’s in 1 minute 35 secs. if you fill up the 4 slide holder and scan all of them on full auto mode, then it will take about 6 minutes and 33 secs. just enough time to read an article and listen to several songs. i am almost finished scanning with my endless color positive slides from the ages. i have been told to keep two versions of the color slides on an external hard drive: one in the original scan mode (dust flecks, sun intrusions, candle darkness, weird angles, etc) to keep the feeling of moment. but as a photographer, i also make a set with all of the dust and imperfections corrected out of the photos. i like these the best. it makes the memories and slides near perfect. it does not take up a lot of room on the external hard drive, so both versions will stay. it is not that bothersome to make two files/folders of each set of color slides.one tip: when the scanner is finished with the 4 slides, make sure the slides are right side up and left to right correct. there is nothing worse than a sign or a license plate in the background reading backwards… when you go through a slide show later.