
[ad_1]
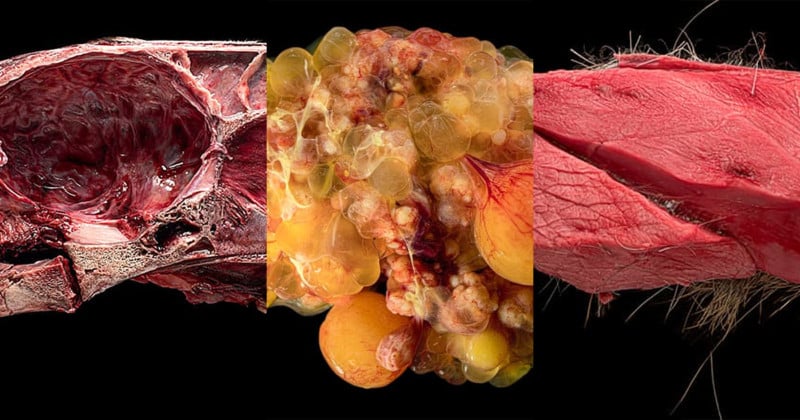
Blood ran over my latex gloves and dripped onto the tile floor as I carried the horse’s head to the stainless steel examining table. Actually, it had been band‐sawn in half, the long way, to give a clear view of skull fractures, so it was only half a head.
I placed the specimen on the table, on top of a sheet of black acrylic which was centered under my tripod. Narrow heavy-duty plastic bags slipped over the feet of the tripod kept them clean. My Nikon D850, attached to the bottom of the inverted column of the tripod, aimed down at the head. I was using my 50mm lens.
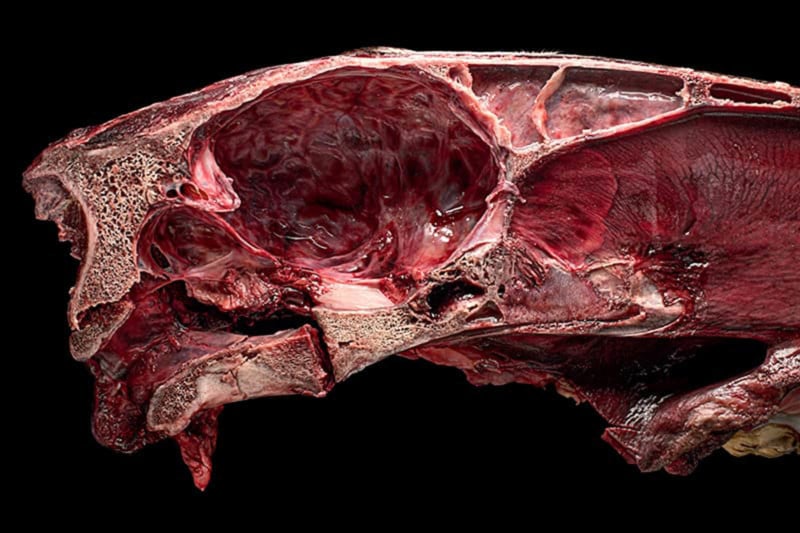
To level the exposed skull, I wadded up balls of paper towel and tucked them out of sight under the head. I used more paper towels to mop up blood, not only to expose the fractures but also because pools of blood tend to distract the eye. I had always been put off by the sight of blood, even in movies. But, totally absorbed in the challenges of my task, it didn’t bother me to have my hands covered in it.
I removed my gloves, careful not to touch the contaminated surfaces with my bare skin, and put them in the biohazard bin. I then scrubbed my hands with disinfecting soap.
My camera was tethered to my laptop with a cable that ran up towards the ceiling, along a length of angle steel suspended overhead, and down to the computer set up away from the specimen area. Viewing the image on the computer screen, I adjusted the height of the camera and positioned the two LED panels low and close to the head.
Each of the lights was covered with a sandwich of layers; closest to the LED elements was a sheet of translucent white acrylic to diffuse the dots of light, then a layer of polarizing film, and on top was a protective layer of clear acrylic.
I rotated the circular polarizer on my lens to remove all glare from the fractures, and to keep it minimal elsewhere. When using two lights, fitted with non‐rotating polarizing filters, it’s hard to remove all glare. The environment precluded the use of softboxes or diffusion fabric. However, as long as it isn’t obscuring the pathology, a little bit of glare can help convey the form and wetness of a specimen.
With one light on at full power, I dialed the other down. I used tethering software, Helicon Remote, to select the focus points of the nearest and farthest parts of the head. Looking at the histogram on the screen, I adjusted the exposure settings. I let the software determine the focus step size and the number of photographs to take. I clicked the icon to start the stack and waited about fifteen seconds for it to finish.
I loaded the images into the stacking software, Helicon Focus, and let it merge them into one image with the head fully in focus. The result was good. I had the stack of raw images on both cards in the camera and also on my laptop. Post-processing could wait until I returned home.
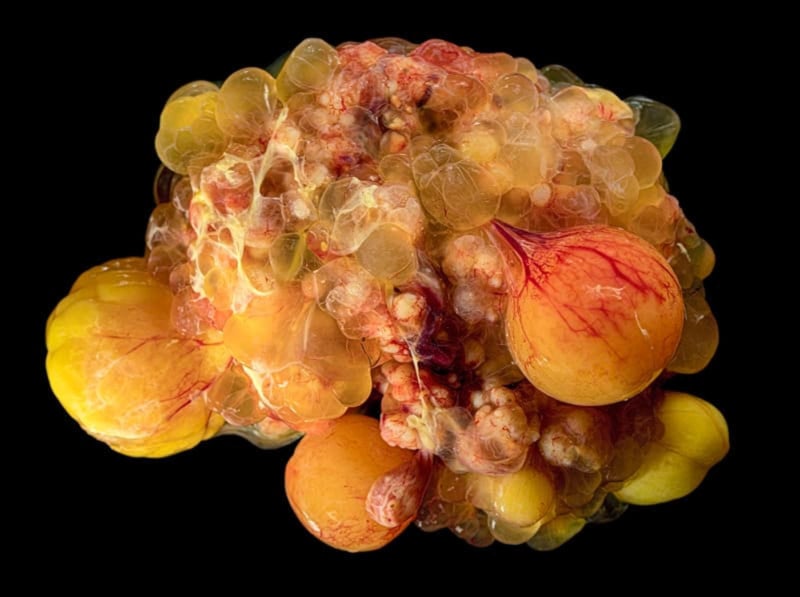
Photographing Cyst-Covered Chicken Ovaries
Finished with the horse’s head, I carried it to the walk‐in cooler and put it in the drum marked for disposal. After removing and cleaning the black acrylic, I put a square of black velvet paper on the table and laid a piece of tempered glass on top of it. I swapped my 50mm lens for my 90mm macro lens and went to the room next door to get my next subject, cyst-covered chicken ovaries.
This was just part of my two-day visit in August 2021, to the California Animal Health and Food Safety Laboratory in San Bernardino, California. I was there at the invitation of Dr. Francisco Uzal, the lab’s Branch Chief. My visit included giving a talk and demonstration of some lighting and macro methods. I also had conversations with staff about equipment and techniques.
Most of my time was spent photographing specimens in the necropsy room. (Necropsy is the term for autopsies performed on animals.) Some of these were for the lab’s use, but mainly I was there to understand their photography needs.
The Role of Photos in Veterinary Pathology
As a photographer obsessed with the technical and aesthetic aspects of the craft, I hadn’t previously thought about non‐photography professionals who take photographs as part of their work. Veterinary pathologists diagnose diseases postmortem. They document virtually every specimen they examine.
The photographs become the de facto evidence for their findings; they are used in research, teaching, insurance claims, and court cases. The photographs must clearly show the presence or absence of the relevant pathologies. Though a quick phone snapshot is adequate for some purposes, a high-quality, well-lit image is often very useful.
The technical and aesthetic principles involved in taking a good photograph of an animal organ are no different from other types of photography; lighting, exposure, and composition all matter. However, the working conditions are, well, unusual. Pathologists work quickly, to keep up with the caseload, in a wet, gory, environment while taking precautions against dangerous pathogens. It’s a very physical job. I’ve seen a pathologist move from an examination table, using a scalpel on a rabbit, to the floor, using a bow saw to cut through a horse’s leg.
And they constantly take photographs. Often, labs have a dedicated camera stand for small to medium specimens. It will typically have two or four strong lights aimed at a glass surface that sits above a black background. But many specimens can only be photographed on the examining table or floor, with pools of blood and bits of fur or feathers cluttering the background.
Given the documentary nature of the photography, there are strict constraints on the types of post-processing manipulations that are allowed. Generally, global adjustments to exposure and contrast are allowed. For some purposes, the background can be painted a solid color. Under some circumstances, local adjustments are allowed for removing distractions that aren’t part of the portrayed pathology.
I’d gone to the lab with some trepidation over how I’d react to seeing and handling viscera. But, by the end of my second day in the lab, when a park ranger brought in a brown bear, I was sorry that I wouldn’t be there the following day to photograph its organs.
I want to thank Dr. Francisco Uzal, and all the staff at the San Bernardino CAHFS lab for their friendliness, their patience, and their dedication to the important work they do.
About the author: David Garnick’s artistic photography is held in public, corporate, and private collections. He collaborates with museums to create imagery for exhibitions, and produces, curates, and judges exhibitions of contemporary photography. He also works with science labs to help them improve and extend their imaging capabilities. You can view his blog and some of his work at davidgarnick.com. This article was also published here.
[ad_2]


