
[ad_1]
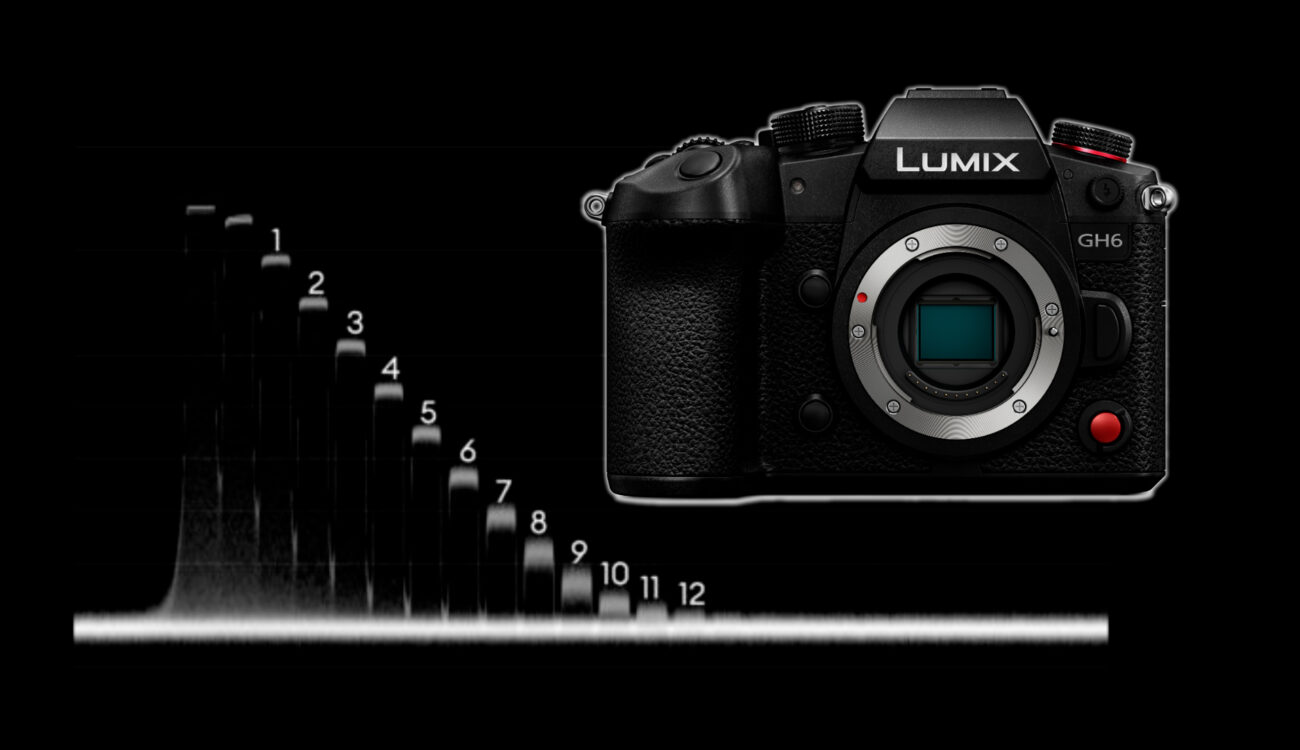
The latest and greatest Panasonic Micro Four Thirds camera has arrived at our CineD office – the LUMIX GH6. Curious to see how it fares? Keep on reading to find out how it compares in terms of image quality to previous LUMIX MFT cameras including the original GH1…
Please have a look at our other articles covering the specs of the new GH6 – in short, this camera is very impressive on paper: internal 5.7K ProRes HQ recording (finally!!) using V-Log, a new dynamic range boost mode combining a high and low gain (ISO2000 and ISO800) into one image plus several other new key features. Wow!
Looking back at the very successful LUMIX GH line, each and every release was a milestone in the camera landscape. As some of you might know from previous posts of mine, my large sensor camera journey started in 2009 with the Panasonic LUMIX GH1 camera, having owned several 3 chip camcorders before. 13 years ago I was totally stunned what the GH1 camera had to offer: it was small, had a great image quality and I was able to adapt virtually any lens using adapters. The first 50$ Canon 50mm f1.4 lens that I bought was offering super shallow depth of field on the GH1 and made me feel like a pro back then 😉
Fast forward to 2022 I sometimes find myself ranting why this or that feature of a new camera is missing – I’m certainly spoiled by recent camera technology. Time to put things into perspective and have a little look what the starting point really was with the original LUMIX GH1 that I loved so much.
If you want to jump directly to the LUMIX GH6 results, please skip the below section.
How was the starting point of image quality with the LUMIX GH1?
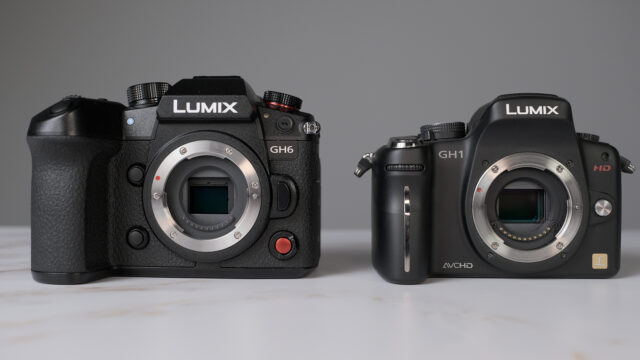
Now, several generations of LUMIX GH cameras later the GH6 is on the table, feeling big and heavy next to my trusty old LUMIX GH1 camera – using Vitaliy Kiselev’s hack to increase the AVCHD bitrate to 25Mbit/s in FullHD ;-).
So what has improved in the last 13 years?
Resolution – the GH1 was able to record video in 8 bit FullHD (1920×1080), using a standard REC709 profile (anyone remember “smooth”? ;-)). The GH6 records 5.7K ProRes HQ V-Log video – that is more than 8x the resolution plus a professional LOG encoding in internal ProRes HQ!
Rolling shutter – the LUMIX GH1 shows 25.4ms – well, the GH6 just halves that (less is better).
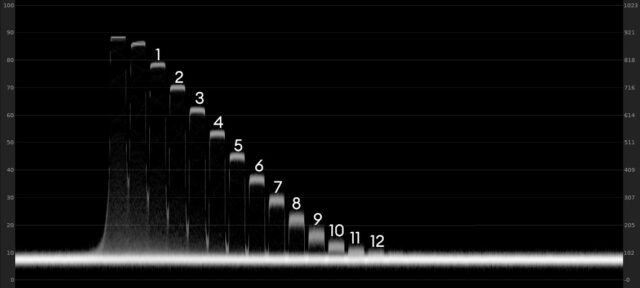
Dynamic range – let’s have a look at the waveform shooting our standard XYLA21 chart with the GH1 – 8 usable stops are visible:

8 stops!? How was I ever able to shoot anything on the GH1 with that seemingly poor dynamic range? Well – interestingly enough, when I now look at some of my early GH1 films on Vimeo they look totally fine to me… it is glaringly obvious that camera technology hasn’t been limiting us anymore for a very very long time.
Coming back to the GH6, as you will see below it has almost 5 stops more dynamic range than the GH1 – how amazing is that?
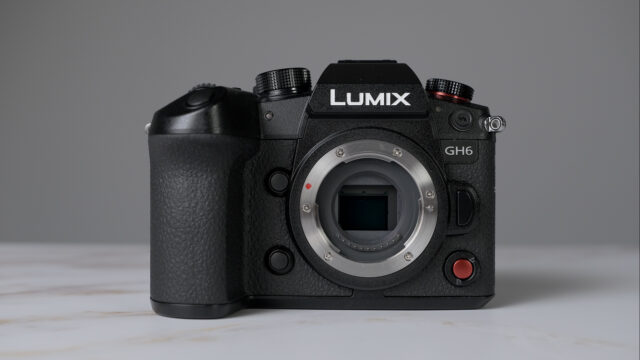
With that small recap on the starting point of the Lumix GH series, let’s look at the brand new GH6:
LUMIX GH6 Rolling Shutter
As usual, our 300Hz strobe light was used to generate the sequence of black and white bars, thereby enabling the measurement of rolling shutter: at 5.7K in 25p and 50p a solid value of 12.7ms is obtained (less is better):

Comparing that to other MFT cameras like the LUMIX GH5 II (lab test here) showing 13.9ms or the LUMIX BGH1 (lab test here) showing 11.9ms, it falls right in between. The leader of the MFT pack is the Z CAM E2 with 11.2ms.
In 4K 100p mode, the rolling shutter becomes even smaller, reading 7.1ms.
LUMIX GH6 Dynamic Range
If you are not aware of how we do our dynamic range testing, please have a look here.
As mentioned earlier, the GH6 offers a new “dynamic range boost” mode, where two ISO values (ISO 800 and 2000) are combined into a single exposure. This DR boost mode can be turned on and off.
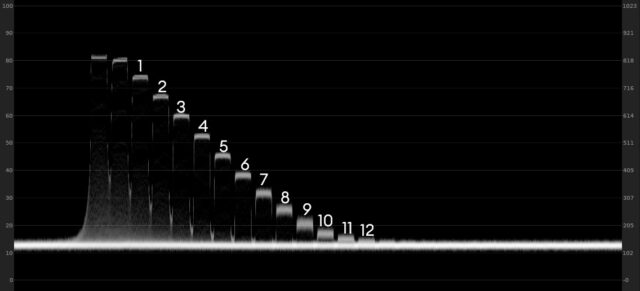
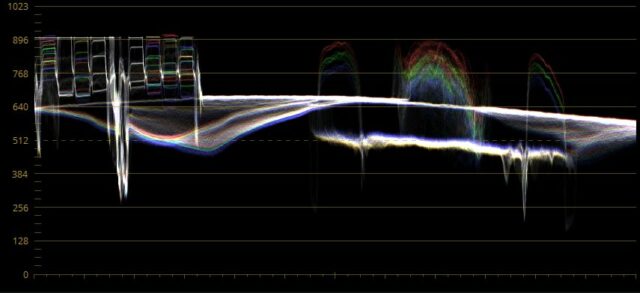
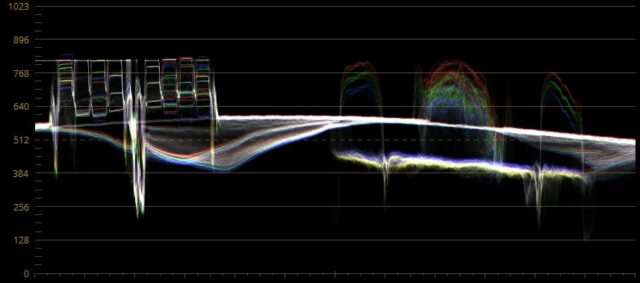
Dynamic Range Boost Mode ON – shooting our standard XYLA21 chart using 5.7K ProRes HQ V-Log mode at ISO2000 (base ISO for DR boost) the following waveform plot is obtained on a 5.7K timeline:
About 12 stops can be identified above the noise floor, plus a faint 13th and a hint of a 14th stop.
IMATEST confirms this, calculating 11 stops at a signal to noise ratio (SNR) of 2, and 12.2 stops at SNR = 1:

In the middle graph above the blue “12.2” line, you can see about 2 additional stops buried in the noise floor.
Those are really good results for a Micro Four Thirds sensor camera – state of the art!
Plus, I definitely like the organic-looking noise floor – in ProRes HQ not too much internal noise reduction is added as it seems.
The LUMIX GH5 II camera shows about 10.5 stops and 11.5 stops at SNR = 2 and 1 respectively. The LUMIX BGH1 camera is a tad better at 11.6 / 12.7 stops at SNR = 2 / 1, however, more noise reduction is used on this camera per default which cannot be turned off.
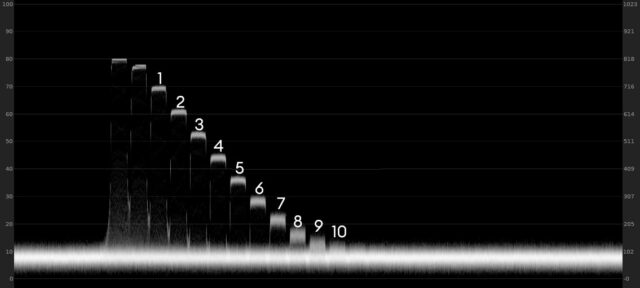
Dynamic Range Boost Mode OFF – without the DR boost mode engaged, the base ISO is 800. In 5.7K V-Log ProRes HQ mode 9.2 / 10.4 stops are obtained at SNR = 2 / 1:
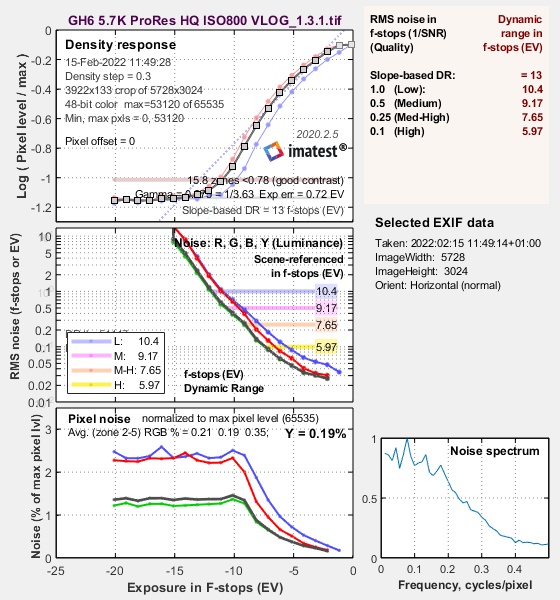
Those results are on the lower end of the dynamic range spectrum for MFT sensor-based cameras – the footage is very noisy, as can be seen in the waveform below:
Also, note how the image clips at 80% IRE – compared to the DR boost mode, where the image clips a tad below 90% IRE. Hence, DR boost mode adds more than one stop in the highlights and is less noisy in the shadows.
Switching the codec to H265 5.7K V-Log ISO 2000 DR Boost mode “ON” – strangely, the code value distribution changes – now clipping occurs at 80%, the noise floor sits higher at around 12% – effectively cramming the dynamic range into a smaller code value bucket:
IMATEST calculates higher values in H265, 11.5 / 12.8 stops at SNR = 2 / 1:
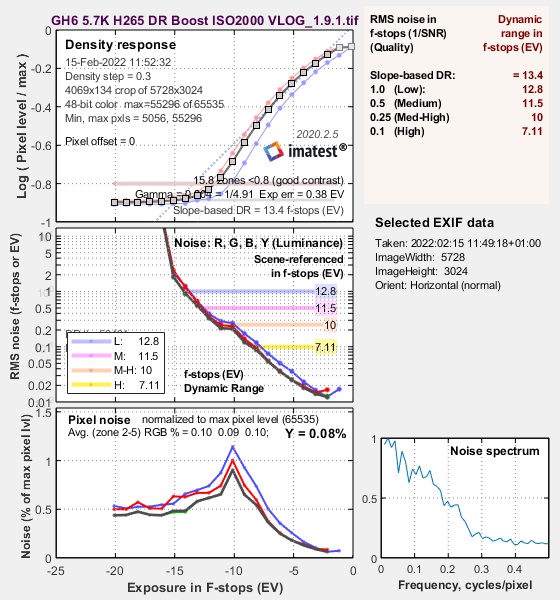
However, this time in H265 not so much shadow information is available, it looks like more noise reduction is going on internally. In the middle graph above the blue “12.8” line, about 1 additional stop is visible inside the noise floor.
So, you actually have a nice choice here: ProRes HQ preserves the “raw” sensor image in a better way leaving all options for postprocessing but is a tad noisier, whereas H265 is very efficient in storage space and gives good DR values out of the box without the need for much postprocessing. But looking at the noise floor in the waveform plot it seems that it also has a lot more noise processing going on internally which cannot be turned “OFF”.
At ISO800 in H265 – dynamic boost mode “OFF” – again higher values than with ProRes HQ are obtained, 9.8 / 10.9 stops at SNR = 2 / 1.
In summary, although H265 reads higher dynamic range values at SNR = 2 / 1, I really like the ProRes HQ images more as they show a very nice, organic noise floor with additional stops that can be retrieved in post-processing. Dynamic range boost mode really works well and adds almost two stops of dynamic range – very nice!
LUMIX GH6 Latitude Results
As written in earlier lab reports, latitude describes the capability of a camera to retain colors and details when over or underexposed and normalized back to a zero baseline exposure level in post.
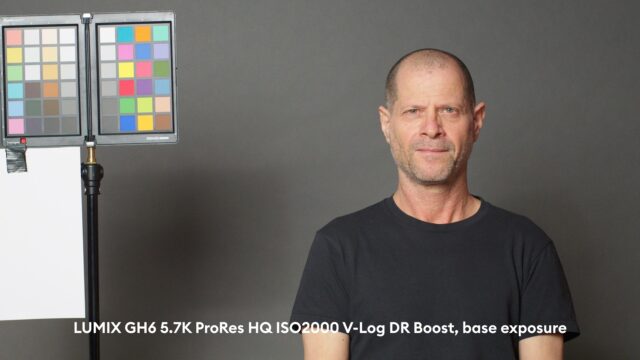
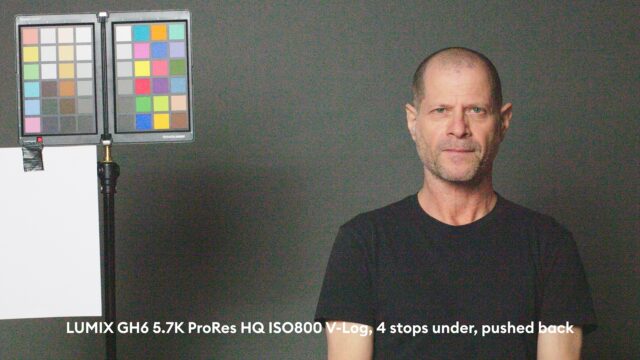
In our case, we have a standard studio scene where the base exposure is (arbitrarily) set to 60% luma value on the waveform for the forehead of our talent, in this case, my dear colleague Johnnie. Camera settings were again 5.7K ProRes HQ V-Log – one set of tests with dynamic range boost “ON” at ISO2000 and another one using “OFF” at ISO800.
We used the ZEISS 35mm T1.5 Compact Prime for the tests. Which unfortunately is quite soft at T1.5.
Dynamic Range Boost mode “ON”
At 3 stops over (T1.5), pushed back to base exposure the following image is obtained:

The red channel at Johnnie’s forehead is close to the clipping value of around 896 in the 10bit space (V-Log ISO2000). On the left side, some patches of the Datacolor Spyder are already clipping.
From there we underexpose the scene by stopping down the iris of the lens from T1.5 to T8, and then onwards by reducing the shutter speed from 1/25 to 1/50, 1/100s, and 1/200 seconds – giving us 8 stops of exposure variation. Let’s see if the camera can cope with that. For reference, the shadows on our standard studio scene are 5 stops below the subject’s face.
The base exposure CineD studio scene looks like this:
Let’s jump ahead at 3 stops underexposure, pushed back to base exposure:
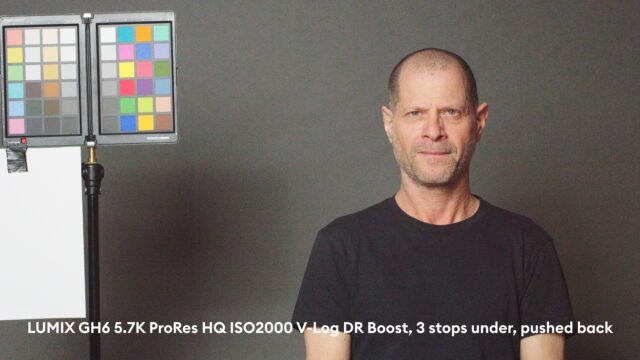
Fine noise is starting to appear, but all is fine so far.
At 4 stops under, pushed back quite some noise is showing up, but it is finely dispersed, looking very organic:
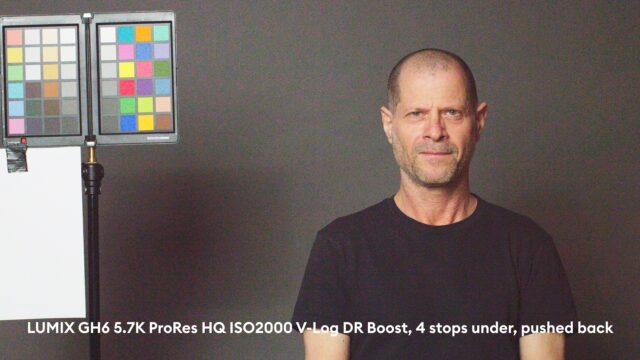
With noise reduction in post, it can easily be cleaned up, see below including the DaVinci Resolve settings:

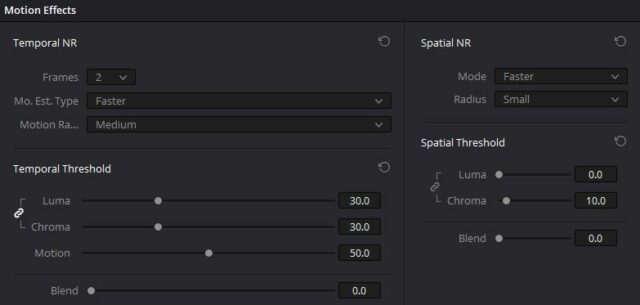
However, faint horizontal lines are showing up, especially after noise reduction – it looks like we are reaching the limits of underexposure.
Let’s have a look at 5 stops under:
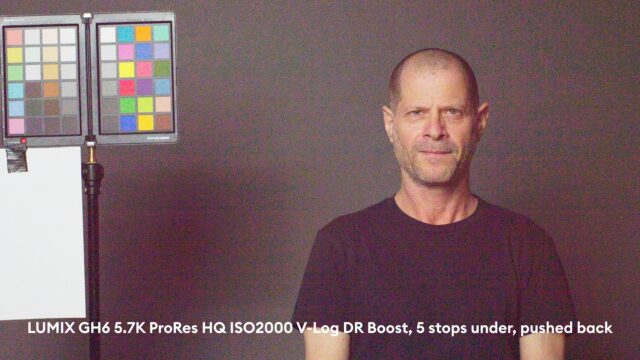
Very strong chroma noise is showing up, as well as horizontal and vertical lines. Let’s see if noise reduction in post can save this:


Well, unfortunately, the answer is no. The image shows a very strong pinkish cast. Just for fun I tried to quickly color correct it, but there are large pink and green blotches in the image which prevent that – game over.
All in all, that leads to 7 stops of exposure latitude (3 over to 4 under)! Wow, that is really good for an MFT camera – it is actually on the same level like the full-frame Sony a7S III which is using a 4 times larger (full-frame) sensor.
The best (consumer) full-frame cameras like the Panasonic S1H or the Sony A1 manage 8 stops of exposure latitude. For reference, the ARRI Alexa Mini LF that we tested here showed 10 stops of exposure latitude (5 over to 5 under).
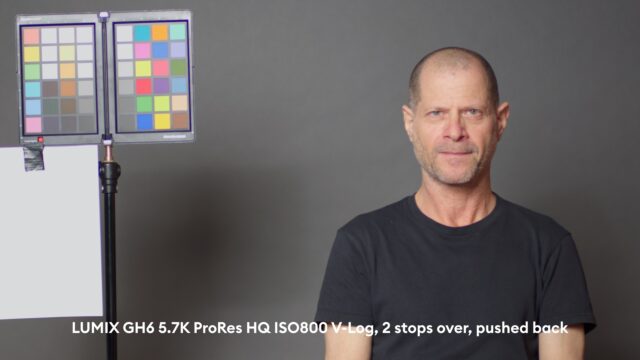
Using dynamic range boost mode “OFF”, a slightly worse result is obtained. Johnnie’s forehead is close to clipping the red channel at 2 stops over:
At 4 stops under, heavy noise starts to appear:
However, noise reduction manages to clean up the image:

However, larger blotches of pinkish noise appear after noise reduction, indicating that we are approaching the limit of underexposure.
At 5 stops under and pushed back to base, noise becomes atrocious:

Noise reduction can save the image to an extent, but I feel it is not really usable anymore – horizontal & vertical lines do appear which are difficult to remove in post:

Hence, without “dynamic range boost mode” the LUMIX GH6 at ISO800 performs worse than the Lumix GH5 II – showing about 6 stops of exposure latitude. With DR boost mode “ON” it is on a similar level with 7 stops in our standard CineD studio scene.
In essence, we find the same result: DR boost mode gives an additional stop in the highlights.
Summary
The new Panasonic LUMIX GH6 shows very strong results for an MFT sensor-based camera in the lab. The rolling shutter value at 5.7K is quite good at 12.7ms, in the middle ground compared to other MFT cameras (the Z CAM E2 shows 11.2ms for example).
In terms of dynamic range and latitude the new dynamic range boost mode works very well and helps to achieve solid results: 11 stops at SNR = 2 and 7 stops of exposure latitude.
Combine that with internal ProRes HQ codec and V-Log, and you have another strong contender in the LUMIX GH line. Did I mention already that camera technology hasn’t been limiting us anymore for a very very long time?
Are you shooting with the LUMIX GH line of cameras? What are your experiences? Tell us in the comments below!
[ad_2]


