
[ad_1]

By now you’ve probably heard of Pratik Naik’s Infinite Tools selection. The series was co-created by Naik and his team to streamline some of the gaps they found in Photoshop and make the retouching process fast and fun. The latest addition is Infinite Skin Panel, a plug-in that works with Photoshop CC2021 and later, and is apparently “perfect for any photographer dealing with the need to soften skin”.
What it is versus what it’s not

The Infinite Skin Panel is exactly what it says on the tin. According to the website, the panel “aims to give you the ability to realistically soften skin tone and detail while ensuring the settings respect the structure of the face.” Indeed the panel is not supposed to replace advanced high-end retouching but instead is aimed at the busy working portrait or wedding photographer that have large amounts of images and a fast turnaround time.
“The goal,” the website says, “is not to replace retouching, but to use it as a primer for skin so you can spend less time retouching.” Sounds good to me! As a portrait photographer who recently has been looking to outsource my retouching due to being too busy to dedicate the time, this sounds absolutely perfect and I was keen to try out the panel and see how it could speed up my workflow.
First impressions


Upon downloading the panel from the website you are given an access key and instructions on how to install it. I have to say it was an incredibly straightforward and intuitive process, I didn’t even read the instructions on how to do it (does anyone?). You then open up Photoshop and there it is.
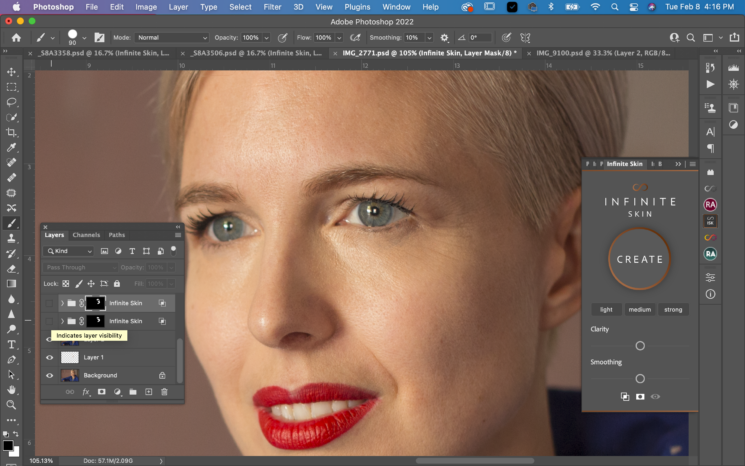
The panel itself is a very stylish minimalist design, along the same lines as the other tools in the Infinite range. The overall look fits in well to the side panel of Photoshop, and you don’t need to have it open all the time, but can either leave it closed until you need it, or you can toggle through your other panels and plug-ins as necessary. That way, even if using a small laptop screen it doesn’t take up a huge amount of real estate.
The function of the panel at first glance also looks incredibly simple but’s that’s the beauty of it. You have three options of light, medium and strong and these, in turn, affect the levels on the two sliders below: clarity and smoothing. If you wish for something more custom than the light, medium, strong options then you can adjust the sliders independently.
At the bottom are three icons: retain highlights (more on this in a bit), create a mask, and the preview button. In the tutorials, Patik suggests keeping the mask and the highlights buttons turned on at all times, although personally, I found the highlights button gave very different and interesting results depending on the image, and I can definitely see a reason for reducing the highlights.
After this, you simply press the create button and the plugin does all the heavy lifting for you. There’s no more need for fiddly frequency separation and guessing the radius, the software calculates all of that for you. It’s actually very clever.
Digging deeper
Now if this all seems a little over-simplistic for your tastes, there is always the option to go into each individual layer in the skin group and make small adjustments. Alternatively, you can use the masking and use it on very small targeted areas, layering it up on various different parts of the skin to achieve the result you want.
If you want to go really in-depth there are further tutorials on the website explaining how to bring back highlights and shadows in certain areas, and using them on specific problem areas such as reducing lines or blending in blotches on the skin.

What I liked
There are a lot of things that I like about this panel. Number one is that it is lighting fast. You can literally get a whole face done in seconds, or at least do a lot of the basic skin work, either as a good starting point or as a nice finish after healing and cloning blemishes.
Because it works so well there is much less need for dodging and burning, at least at the detail scale. It also removes the need for tedious frequency separation work, something that I almost never do anyway unless absolutely necessary. But I have always wondered if occasionally my images would have that extra layer of polish if I went that step further.


The gradients are incredibly smooth, and it really does a good job of retaining pore detail. It simply smooths the transitions making the skin surface look more uniform while still retaining a natural quality. The other great thing is that it works really well on lips. Lips have always been a problem area for me and are often something I forget about, so it’s great that this tool works just as well for that too.
The option to retain highlights or not is also very useful. On some images, I found that I wanted to reduce the highlights in some parts of the face, for example on the forehead. So I was able to target that area specifically and reduce just those unwanted highlights a little.
The other great advantage of this panel is just how much you can control the level you want. Either through the sliders or through the masking. You can change the flow of the brush on the mask and get exactly the amount of smoothing you want for any part of the image. Or you can use it universally if that’s what you want. The versatility is fantastic and for that reason, I think it does deserve its Infinite title.
What I didn’t like
Now of course there are always going to be things that weren’t quite what I was expecting, although it’s fair to say that there aren’t too many of those. Firstly, this isn’t a portraiture AI program that goes in and retouches everything on the face whether you want it to or not. That’s actually a good thing in my opinion. But, on the majority of faces, you are still going to have some blemishes to remove, using the healing and cloning tools. This does mean that your skin work isn’t just a push of a button, which for bulk amounts of images can still be incredibly time-consuming. For most even type work I wouldn’t spend time doing any kind of more involved skin work anyway unless it was specifically requested (and paid for).
I did find that the shadows were flattened somewhat during the process. Yes, the transitions were beautifully smooth, but then the shadows lacked a little punch. Now there is a video that shows you how to dial those back in, but it requires more steps in Photoshop, something that the panel is supposed to be reducing.

The other issue I have is that the medium and high settings were at a very high level of smoothing for my tastes. The images above were set to the strongest option. Now I do understand that these things vary depending on culture and what part of the world you’re in, so to have a range is useful. However, I think I would mostly be keeping to the light setting in most instances, and perhaps using the heavier settings for targeted small areas only. It could be very easy to go overboard and use the panel at too high of a level without realising!
Wrap up
Generally, I would say that this panel works very well, for the use that it was intended for. No, it won’t ever reduce the need for high-end retouching. But the power of the plugin combined with the speed is a huge advantage. Just cutting down a few mins worth of work on each image is a positive thing. I do think its use is still going to be using it in targeted small areas rather than as a global filter, but it’s so versatile it can basically be used in whatever manner works best for you. I will absolutely continue to use the panel and see it as yet another brilliant tool in the vast box that is becoming the Infinite panel series.
The Infinite Skin Panel is available to download from the website and costs $79.
[ad_2]


