
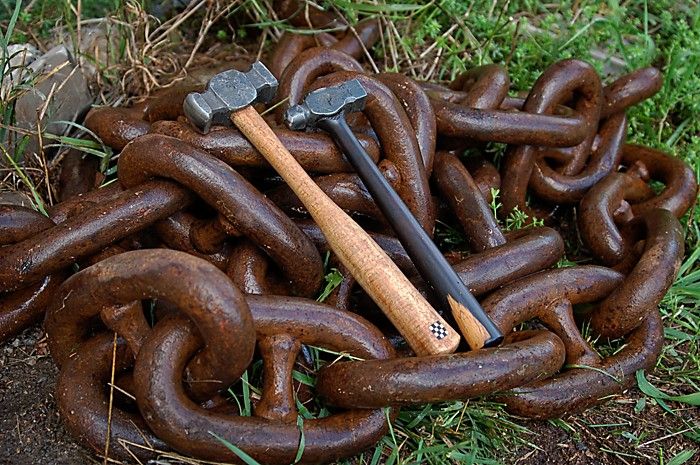
Recently, I had the rare opportunity to pay homage to an old sea going tugboat that has a strong connection to my family. When I acquired ten feet of the ship’s anchor chain I decided to capture this bit of family history by having a chain link forged into hammer heads by blacksmith Nick Verbree.
In the 1940s my grandfather headed up the Montreal Dry Docks where he over saw the building of Canadian Naval vessels. In 1943, during WWII, my grandmother launched one of his ships – the HMCS Norton. The Norton went on to serve the remainder of the war as a salvage tug in the Western North Atlantic. Post war, the Norton was sold to a logging company in Northern Ontario, Canada and the ship was renamed the Peninsula. The tug hauled logs until it was decommissioned in 2018.

I really wanted to create strong but stylish hammer handles to grace the forged hammer heads. So here’s how I set achieving that goal.
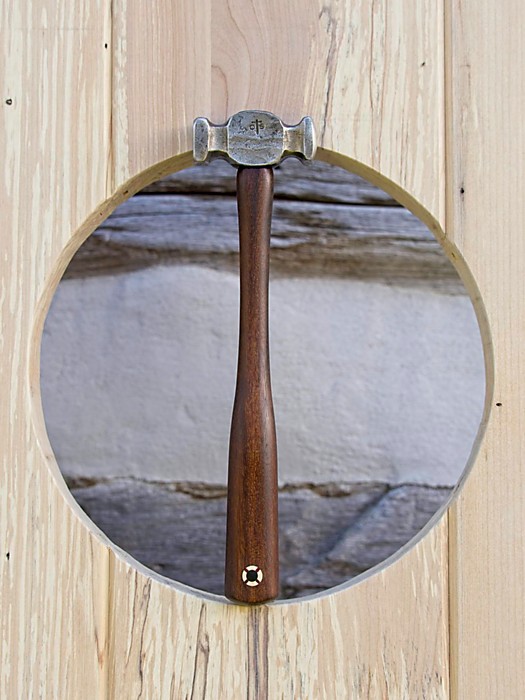
I fashion my hammer handles after an antique cobblers hammer that feels oh so right in the hand. Vintage cobbler’s hammer are not just handsome tools, they are also well suited to cabinet makers work with their large domed face. When restoring old hammer heads, I polish the face of the hammer by progressing through sandpaper grits until a good shine is achieved. The rest of the hammer head is left untouched.
To achieve the classic hammer handle look, a slim neck is a must but the handle also needs to flare ever so slightly at the bottom to terminate the grip. Ten inches is a good length for an average hammer handle. Anything shorter and it might not have the right balance.
To start, I rough out my hammer handles on the lathe but a drawknife, spokeshave or a file can also be used for this work. Regardless of the roughing method that’s used, the same principals apply to the layout and finish work. It is important to select a hardwood with no knots and very straight grain for a strong handle. This hammer handle is not round. A blank of 1” x 2” x 11” was roughed out on the bandsaw, then turned on the lathe until the maximum diameter of 1-1/2” is achieved across the entire length of the blank.
To copy a handle, make white marks at one inch intervals along the length of the original handle and record the dimensions for the X and Y axis. This may seem like overkill but these measurements are a handy reference when your handle shape goes awry and you can’t figure out why it doesn’t have the same feel as the vintage pattern.
To transfer the pattern to the turning blank not every cross section measurement is needed. Use the grid and the measurements above to determine the key transition points needed to duplicate the vintage handle’s shape. Mark these key transition points on the vintage handle using a red lumber crayon. Then transfer them from the vintage handle to the blank on the lathe.
When copying an existing handle, get ready to make your first cut by taking a measurement at a red reference mark using a set of callipers. Set the callipers to the exact measurement and then open them up a smidge for a bit of wiggle room, which might be needed later. If you are following a pattern on paper then set your callipers to the required measurements using a ruler and then open them a smidge.
Before cutting the first red mark to depth, double and triple check that you are at the correct red mark on the handle. Then, using a parting tool, cut down to the desired diameter. Stop and check the diameter regularly with the callipers. When the callipers fit snuggly over the cut the desired diameter has been achieved.
Continue to cut each red mark to its correct depth. The “hole” in the hammer head is called the “eye”. To turn the tenon for the hammer head first measure the maximum width of the eye with inside callipers. Then measure the length of the eye and add 1/2” to this measurement to arrive at the length of the tenon needed on the handle. The tenon must stick out well above the top of the hammer head. Any excess will be cut away later.
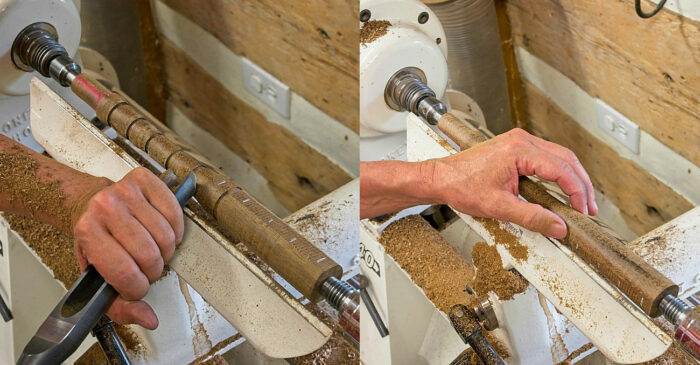
Start shaping the hammer handle by turning the tenon for the hammer head first, since it’s the only crucial measurement. When the tenon is cut to size, mark it boldly with red lumber crayon so as not to cut it again by accident. With the critical measurement out of the way, relax and turn the rest of the handle down to the depth of the reference marks that were made earlier with the parting tool.
When the handle is close to final shape, turn the lathe off and run your hands over the handle to see how it feels. Consider closing your eyes or looking away to feel for areas where the transition points don’t flow. When ready, turn the lathe on and clean up these areas before moving on to the hand tool work.
Now it is time to use a spokeshave, small plane or a file to smooth the transitions from the flat to the round parts of the handle. I turn the lathe off and use it as a vice do this work, by locking the lathe’s headstock with the indexing pin. The hand work can also be done at a bench. It can be difficult to judge the handle shape while it is on the lathe, so don’t be afraid to take the handle off the lathe and to hold it in your hand or to view the handle in an upright position. After working with the hand tools, feel free to remount the handle and turn it again on the lathe if needed. That’s the beauty of leaving the lathe’s centre marks on each end of the handle until the handle is finished.
When the handle shape is complete, finish the turning by shaping the end of the handle using the turning tools. Leave a very generous nub on the end of the handle so it can be hit with a mallet later when test fitting the hammer head on the handle. Next, with the hammer handle still on the lathe, remove the tool rest and sand the hammer handle down to 400 grit. Then stop the lathe and sand with 400 grit in the direction of the grain.
It’s now time to remove the handle from the lathe and wipe it down with a very wet cloth, which will raise the grain. Let it dry and sand in the direction of the grain with 600 grit paper. Now the handle can be burnished to a high shine. Remount the handle on the lathe (without the tool rest) and burnish the wood handle by holding a handful of wood shaving from your turning against the spinning handle.
The first step in fitting the hammer head is cutting the round tenon to width. Begin by resting the hammer head on the tenon and transferring the measurement to the top of the tenon with a marking knife. Using these marks, cut the tenon with a hand saw.
To further shape the tenon use a file to round the tenon corners. With a marker draw a line where the material needs to be removed and file away the marker ink to confirm that material is being removed from the correct area.
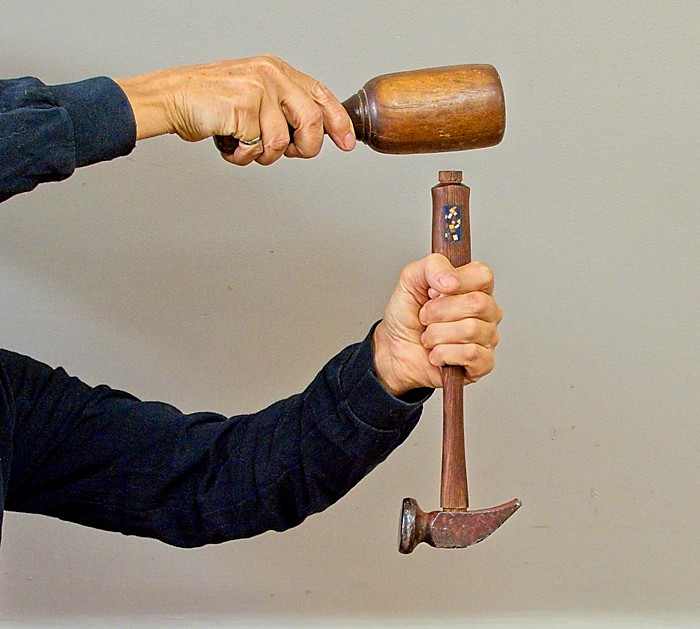
Finally it is time to fit the hammer head onto the handle. Use a wooden or dead blow mallet to work the hammer head onto the handle. The eye of the head may not be symmetrical so make a reference mark on the top of the tenon to indicate which way the hammer head fits on the handle. Use this mark to orient the handle on the head each time the hammer head it is removed.
To ensure a tight fitting hammer head work slowly and watch for rub marks that appear where the eye of the hammer contacts the tenon. That’s where the material should be carefully be removed if the head is not seating correctly. To remove the handle for further shaping of the tenon simply tap the top of the tenon with a bit of wood small enough to fit inside the eye. Rather than removing material from the tenon, another option is too compressed the wood fibres by laying just the tenon on an anvil and hitting it with a metal hammer. Later, oil will be used to swell these fibres back to their original shape.
There are no hard and fast rules for securing the hammer head onto the handle. So much depends on the eye of the hammer head. You need to just go with the flow. A hand forged or antique hammer head may not have a uniform eye. Sometimes a wedge is needed in a direction that was never anticipated.
Fit the handle eighty percent of the way onto the head and then decide if the handle needs a wedge. Also note which direction to place the wedged for the most secure fit of the hammer head to the handle. If the handle needs a wedge, cut a kerf for the wedge into the tenon. A wooden wedge or a steel wedge can be used on shop hammers.
With luck, sometimes a hammer handle doesn’t need a wedge. If the hammer head fits snugly on the tenon and the tenon fibres are swollen with good soaking of oil (for several days) then no wedge is needed. This technique is often used on Japanese hammers but it requires a very uniform hammer head eye.

I don’t inlay a handle any earlier in the process because in the past, I have broken the odd tenon while installing a hammer head. Stay tuned for my next article that will outline this inlay process in detail.
To complete the hammer head installation, fit the head onto the handle, making sure the head seats snugly against the handle at the bottom of the tenon. If needed, adjust the tenon shoulder, using a chisel to achieve a tight fit. Cut the tenon to length so it is just proud of the top of the hammer head and pound the wedge into place.
When installing a wooden wedge don’t forget to put a little glue on the wedge before hammering it in place. Of course, steel wedges don’t need glue. A wooden wedge is handy when a standard steel wedge is not wide or thick enough. To make the installation of a wooden wedge easier, hammer a steel wedge partway in, remove it with a set of pliers and then hammer the wooden wedge in with glue. In this example, the ebony wooden wedge all but disappears once the tenon is oiled. Lastly, cut the nub off the bottom of the handle and file and sand it smooth.
Now for the most satisfying moment of all. Apply a coat of your favourite oil to the handle and the hammer head and begin using your hammer.


