
“The problem of chair design is considered to be the most demanding in furniture—and for good reasons,” says John Grew-Sheridan, who has thought about it a lot. Structural integrity is critical, even more so than for other furniture. At the same time, a chair must be comfortable and pleasing to the senses. The world has no shortage of ugly chairs that are comfortable or pretty chairs that aren’t, so we have plenty of evidence that combining strength, comfort, and comeliness in one design is not without its difficulties. San Francisco furniture makers Carolyn and John Grew-Sheridan have worked out an approach to chair design that ensures a chair will be comfortable while demonstrating that “the dictates of comfort need not interfere with aesthetic considerations because,” as John says, “there are an infinite number of ways to connect the critical structural and support points of a chair.”
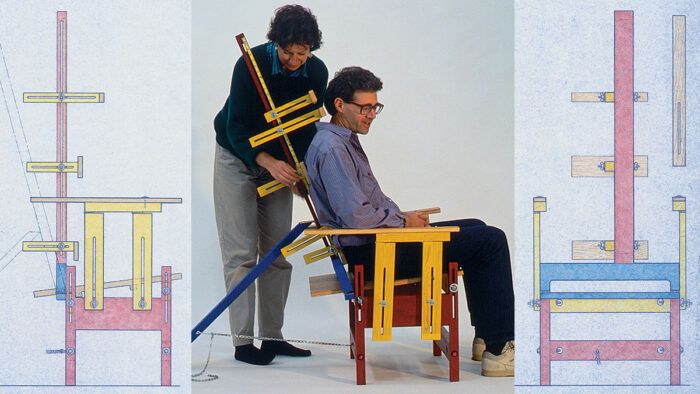
The Grew-Sheridans have been making chairs since 1975, and teaching others how to make them since 1980, when the University of California invited the couple to give a seminar on the subject. In preparing for the seminar, the Grew-Sheridans designed an adjustable rig for measuring individuals for custom-fitted chairs (see the photo above) and developed an inexpensive way of making full-scale mockups of their designs. Using the adjustable rig, they determine various chair dimensions, plot them as points on a graph, and then transfer the coordinates onto a perspective drawing grid (available from art-supply stores). The result is a skeletal perspective sketch, or stick figure of the chair, showing all the critical dimensional relationships but still devoid of any form or structure (see the drawing below).
After working through the aesthetic and structural aspects of a chair’s design on tracing paper over the grid, the Grew-Sheridans next make a full-scale model of the chair by laminating ordinary corrugated cardboard into “lumber” with thinned white glue, shaping the cardboard lumber into chair parts and hot gluing the “joints.” This technique allows them to make modifications with a minimum of effort, saving wood, money, and grief.
|
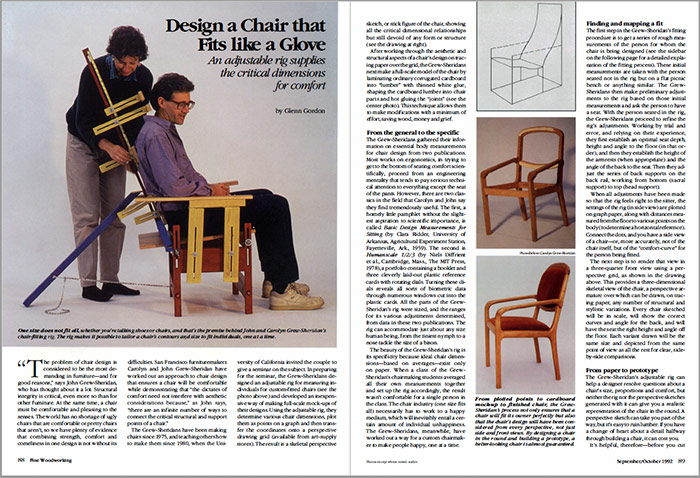
From plotted points to cardboard mock-up to finished chair, the process used by the Grew-Sheridans not only ensures that a chair will fit its owner perfectly but also that the chair’s design will have been considered from every perspective, not just side and front views. By designing a chair in the round and building a prototype, a better-looking chair is almost guaranteed. |
From the general to the specific
The Grew-Sheridans gathered their information on essential body measurements for chair design from two publications. Most works on ergonomics—in trying to get to the bottom of seating comfort scientifically, proceed from an engineering mentality that tends to pay serious technical attention to everything except the seat of the pants. However, there are two classics in the field that Carolyn and John say they find tremendously useful. The first, a homely little pamphlet without the slightest aspiration to scientific importance, is called Basic Design Measurements for Sitting (by Clara Ridder, University of Arkansas, Agricultural Experiment Station, Fayetteville, Ark., 1959). The second is Humanscale 1/2/3 (by Niels Diffrient et al., Cambridge, Mass., The MIT Press, 1978), a portfolio containing a booklet and three cleverly laid-out plastic reference cards with rotating dials. Turning these dials reveals all sorts of biometric data through numerous windows cut into the plastic cards. All the parts of the Grew-Sheridans’s rig were sized, and the ranges for its various adjustments determined, from data in these two publications. The rig can accommodate just about any size human being, from the tiniest nymph to a nose tackle the size of a bison.
The beauty of the Grew-Sheridans’s rig is its specificity because ideal chair dimensions—based on averages—exist only on paper. When a class of their chairmaking students averaged all their own measurements together and set up the rig accordingly, the result wasn’t comfortable for a single person in the class. The chair industry (one size fits all) necessarily has to work to a happy medium, which will inevitably entail a certain amount of individual unhappiness. The Grew-Sheridans, meanwhile, have worked out a way for a custom chairmaker to make people happy, one at a time.
Finding and mapping a fit
The first step in the fitting procedure is to get a series of rough measurements of the person for whom the chair is being designed. These initial measurements are taken with the person seated not in the rig but on a flat picnic bench or anything similar. The Grew-Sheridans then make preliminary adjustments to the rig based on those initial measurements and ask the person to have a seat. With the person seated in the rig, they proceed to refine the rig’s adjustments. Working by trial and error, and relying on their experience, they first establish an optimal seat depth, height, and angle to the floor (in that order), and then they establish the height of the armrests (when appropriate) and the angle of the back to the seat. Then they adjust the series of back supports on the back rail, working from bottom (sacral support) to top (head support).
When all adjustments have been made so that the rig feels right to the sitter, the settings of the rig (in side view) are plotted on graph paper, along with distances measured from the floor to various points on the body (to determine a horizontal reference). Connect the dots, and you have a side view of a chair—or, more accurately, not of the chair itself, but of the “comfort-curve” for the person being fitted.
The next step is to render that view in a three-quarter front view using a perspective grid. This provides a three-dimensional skeletal view of the chair, a perspective armature over which can be drawn, on tracing paper, any number of structural and stylistic variations. Every chair sketched will be in scale, will show the correct curves and angle for the back, and will have the seat the right height and angle off the floor. Each variant drawn will be the same size and depicted from the same point of view as all the rest for clear, side-by-side comparisons.
From paper to prototype
The Grew-Sheridans’s adjustable rig can help a designer resolve questions about a chair’s size, proportions, and comfort, but neither the rig nor the perspective sketches generated with it can give you a realistic representation of the chair in the round. A perspective sketch can take you part of the way, but it’s easy to ruin lumber: If you have a change of heart about a detail halfway through building a chair, it can cost you.
It’s helpful, therefore—before you cut any stock—to see what a chair will look like in three dimensions. One way to do that is to make a scale model. A better way is to make a full-size mockup. The Grew-Sheridan technique for making full-size mockups is quick, cheap and surprisingly effective at evoking the look of the finished chair. The material they use—corrugated cardboard—has good modeling properties: body, thickness, and even a certain amount of strength. Using thinned white glue, they laminate the cardboard to whatever dimension of stock they need, then draw the pattern for, say, a chair arm on it, and bandsaw it out just as though they were working a piece of wood. They then use disc sanders, rasps, and files to shape the arm, which goes quickly because the corrugated cardboard is really mostly air. Because the material is so easily worked and can usually be had for nothing, there’s no reluctance to experiment.
Form follows function
Practicality, directness, and an economy of means characterize the work of the Grew-Sheridans as chairmakers. Their premise as designers is reflected in some passages John quotes from Form and Function, by Horace Greenough, first published in 1843: “The most beautiful chairs,” wrote Greenough, “invite you by a promise of ease, and they keep that promise; they bear neither flowers nor dragons nor idle displays of the turner’s caprice.”
“Greenough was searching for great principles of construction,” explained Carolyn. “He argued that one should first look at the use and only then turn to the decorative elements. He believed the conflict in design is between the essential and the pretentious.” In other words, everything in the design of an object, whether it’s a canoe or a shoe or a chair, ought to be subordinate to function. If this idea is respected—if function is clearly understood and sympathetically addressed and the consciousness of it extended to such considerations as the chair’s interaction with the sitter’s body, the finish of the wood, the feel of the fabrics, the intention in the flare of the curves—form will flow from it. The most comfortable (and the most beautiful) chairs aren’t conceived as cakes to be decorated with a pastry tube. The beauty of a chair—whether it’s the ancient Greek Klismos chair or one of Hans Wegner’s contemporary pieces—comes instead from the character of its response to structural necessity. They maintain a tradition in the design of functional objects in which practicality and beauty aren’t at odds but are rather in equilibrium—are, in fact, one and the same, a tradition that John and Carolyn Grew-Sheridan are helping to sustain.
Fitting the chair to the customerThe first step in the fitting process is to measure the person sitting on a plain flat bench. This provides a set of starting measurements of the person’s body that we can transfer to the rig. We’re careful to make absolutely clear to the person we’re fitting that this is only a preliminary setting or starting point. We’ve found if we don’t emphasize this point, often people will refrain from telling us that the seat-to-back angle’s too acute or the thoracic support is too low. We try to loosen them up and get them involved in the fitting process. Taking measurements The first measurement, known as the popliteal, is taken by measuring from the floor to the underside of the thigh at the knee. The customer should have on the same shoes that will typically be worn when sitting in the chair. Then we measure from that same point in the crook of the knee to the surface of the back. Next, holding a yardstick against the person’s back with the end of the yardstick on the bench, we measure the height of the waist. We determine the location of the waist by having the customer bend to the side while seated. As it turns out, if you carry the waist measurement around to the back, that’s just about where most people like to feel lumbar support. We measure from seat to elbow to determine armrest height and note the relaxed spread of the arms well for the width of the armrest at the elbows. The angle of the armrest is less predictable, we’ve found, so we just experiment until we hit upon a comfortable angle. Next, we measure from the seat to the underarm. This measurement is required for dining chairs in particular because it tells you approximately where to position upper back support. Just as a dining chair requires upper back support, each type of chair has its own special traits and requirements. All chairs need to be wide enough in the seat—obviously—to get in and out of, so we take a seated hip width measurement; shoulder width isn’t that significant a measurement unless you’re building a chair that will partially envelop its owner, such as a large stuffed chair or recliner. Nevertheless, while we’re measuring, we get all the information we can; there’s no telling when a client we’re fitting for a reading chair will want to order a set of dining chairs. The final two vertical measurements that we take are from the seat to the nape of the neck and from the seat to the back of the head. These measurements are most critical for a chair designed primarily for relaxing in, where head support is absolutely essential. Next, with the yardstick (or some other straight edge) still in place against the person’s back and the person sitting up straight, we measure the horizontal distance from straight edge to lumbar (waist measurement transferred to the back), then from straight edge to the juncture of head and neck (the nape) and last, from straight edge to the back of the head.
Adjusting the rig Setting the rig is straightforward once we have all the above measurements. The measurements and angles vary for different kinds of chairs, but for the sake of explanation, let’s presuppose we’re designing a reading chair. We set the seat depth first to about 2 in. less than the measured under-thigh length and then set the seat height at the knee to about 3 in. less than the popliteal measurement. We drop the rear of the seat 3 in. from the front setting (or 5 in. from the popliteal). We set the arm width at the elbow next (this generally falls in a fairly narrow range—between 21 in. and 23 in.) and then set the arm height at the elbow about 1 in. t0 2 in. greater than the seat-to-elbow measurement. For this preliminary setting, we position the back at 105° to the seat. Since we’re adjusting the rig to fit the customer, this seat-to-back angle will often change. If we run out of range as we’re adjusting the settings of the back supports, we can change the seat-to-back angle. We adjust all the back supports using the measurements just taken, beginning with the sacral (1 in. forward of the back rail, 3 in. up from the seat). Proceeding up the back, we adjust the lumbar support—probably the most important—(usually 8 in. to 10 in. up, 1 in. to 2 in. forward of the back rail), thoracic support (set at the height of the underarm, at the same distance from the back rail as the sacral adjustment) and, finally, the neck and head supports. These last adjustments vary widely: a survey of 55 of our former and current chairbuilding students revealed a vertical range of 14 in. From this point on, it’s really just a question of using your common sense and making increasingly finer adjustments. The chair’s intended use, how it will relate to other furnishings (such as a dining or end table) and whether the chair’s owner wears heels, flats, sneakers (or is barefoot) all need to be considered when translating the information gathered on the rig into a chair design. When we schedule a fitting, we encourage the customer to bring whatever is necessary to make the fitting absolutely realistic. That might mean a pair of slippers and a book or a newspaper—or even a bowl, spoon, box of corn flakes, and a quart of milk. Pretending to eat a bowl of cereal while reading the paper just isn’t the same as actually doing it, and we want the chair to be comfortable in use. Drawing: Heather Lambert. Carolyn and John Grew-Sheridan design and build furniture and teach furniture making in San Francisco. |

 Glenn Gordon, a writer and craftsman, lives in St. Paul, Minn.
From Fine Woodworking #96
To view the entire article, please click the View PDF button below:
View FREE Project


