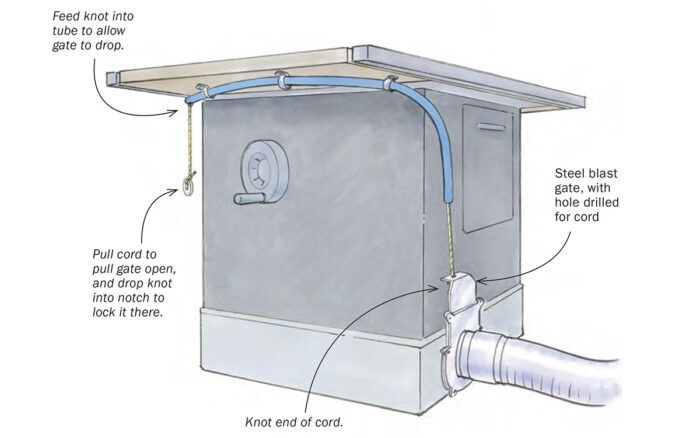
Blast-gate locations usually aren’t very accessible, requiring awkward stooping and reaching to open and close them. I solved the problem with a simple mechanism that controls the gate from the front of my machines, where the power switches are. I installed the first one on my tablesaw.
First, I cut a length of flexible 1/2-in. PEX tubing (used for plumbing) to reach from the front of the saw to just short of the blast gate flap when it’s fully open. Any stiff but slightly flexible tubing can be substituted. Before attaching the tube to the saw, I threaded a length of drapery cord (braided nylon) through it, by running my shop vacuum at one end and feeding the cord into the other. Next, I fastened the PEX tube to the saw using tubing clamps. Zip ties will also work as long as the tube doesn’t move significantly in use. I then drilled a hole in the top of the gate and tied off the cord there with a double overhand knot.
At the front of the saw, I cut a notch in the tube and put another knot in the cord, positioned so it would catch in the notch with the gate fully open, and added a weight to the end of the cord. When I release the knot from the notch and feed it into the tube, the gate closes.
You’re relying on gravity to close the gate, so it needs to be positioned as vertically as possible, with smooth, friction-free action. Metal blast gates work better than plastic for this setup, as plastic blast gates tend to be sticky. While most metal gates will work as is, you can take yours apart and smooth any rough internal edges to improve the action, or even add some weight to the top of the gate.
—DENNIS VOLZ, Parker, Colo.
Illustrations by Dan Thornton
From Fine Woodworking issue #296


