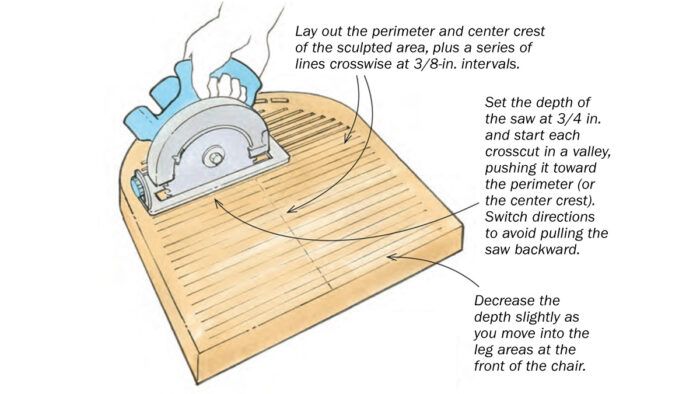
On a recent bar-stool project, I was struggling to find a controlled way to carve out the wooden seat. Then I realized that the 7-1/4-in. blade in a circular saw would create a nice curve for the edges of the sculpted areas, and by making a series of cuts to a penciled layout, I could control the depth and slope in all areas, making it easy to remove the waste in a uniform way.
Start by marking the perimeter of the sculpted area at the sides and back. Then lay out a centerline to mark the crest that goes between the legs of the sitter. Last, mark pencil lines across the entire sculpted area, 3/8 in. apart, to guide your cuts. Now set the cutting depth of the saw (3/4 in. worked well for me) and make plunge cuts across the back of the seat, starting and stopping the cuts at the pencil lines. It’s best to start in the valleys and push toward the perimeter. Pulling the saw backward will cause it to jerk up and back, past the line.
In order to leave a raised section between the sitter’s legs, you’ll be making two sets of plunge cuts in the front half of the seat. You may also want to decrease the depth of cut as you approach the front edge, leaving the back of the seat a bit deeper. Last, make a series of radial plunge cuts around the back edge to create an even slope there too. Make a lot of cuts in the back area so the waste is easier to chip out.
With the sawcuts as your guide, it’s easy to pop out the waste blocks with a wide chisel and then go to work smoothing the seat.
—DAVID GRIFFITHS, Santiago, Chile
Illustrations by Dan Thornton
From Fine Woodworking issue #292


