
[ad_1]
With the iPhone 13 and its Cinematic mode, you can shoot videos with a bokeh effect. We explain how you can shoot beautiful videos with depth of field and how to edit them afterwards – on the iPhone 13 series as well as on other devices.
You can usually tell right away if a video was shot with a smartphone or an “actual” camera. The big difference would be the selective focus, which lets the person filming choose whether to make the foreground or background float, literally focusing on the subject.
Jump to:
How does the Cinematic Mode work?
While smooth bokeh in the past required system cameras or professional camcorders with large sensors, you can also create a similar blur using software on modern smartphones. Yes, some Android smartphones have already been capable of filming video with bokeh for years: But it simply doesn’t work in a user-friendly and clean manner on the competition as it does with the Cinematic Mode found in the iPhone 13 series.
The ‘magic’ is how the iPhone 13 records a depth map alongside the videos. Raw videos recorded by the smartphone are sharp from foreground to background. Now, if either the iPhone itself or the user sets the focus in the video, the Cinematic Mode will soften the spatial areas in front and behind.
Since the iPhone saves the videos in raw, the depth map and the defined focus point are separate from each other, allowing the focus of the video to be edited afterwards not only on the iPhone 13 itself, but also on other devices.
As for the recording itself, Cinematic Mode is currently available for the wide-angle and telephoto cameras on the back, as well as the selfie camera. The following iPhones support Cinematic Mode: iPhone 13, iPhone 13 mini, iPhone 13 Pro, iPhone 13 Pro Max.
Cinematic Mode: How video recording works
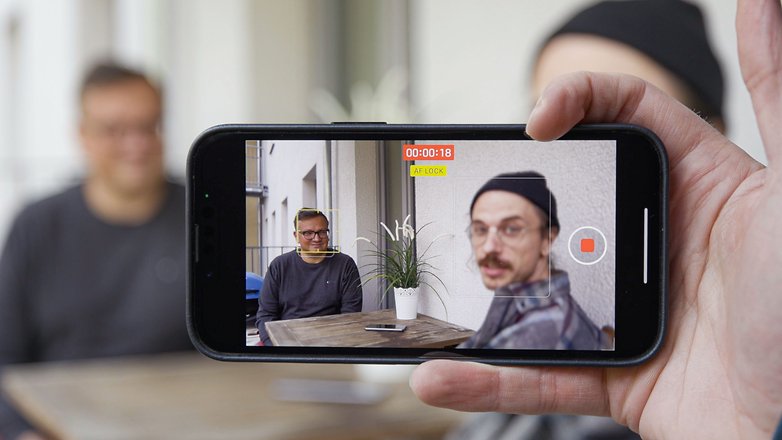
Cinematic Mode is prominently featured in the Camera app of the new iPhones, located between the Video and Slow Motion modes. A tap will activate the respective mode, and the record button begins (surprise, surprise!) the recording.
By default, the camera app highlights all recognized faces and animals, for that matter, while recording. While the recording is running, the Cinematic Mode tries to determine the most active person and set the focus accordingly. However, you can also shift the focus manually by tapping on the display. In the following video, you can see how the focus only changes automatically when Ben speaks to the camera in the foreground. Otherwise, Cinematic Mode keeps the focus on Fabi until we manually change it with a tap of our finger.
By the way, “manual focusing” works not only with people but also with objects. The Cinematic Mode then tracks them and keeps them in focus. With a long tap, you lock the “virtual autofocus” to a certain distance and thus keep, for example, a person or an object in the foreground in focus, no matter what is happening in the background.
Cinematic Mode offers the following setting options:
- The curved “f” in the upper left stands for the focal ratio. The smaller the number, the stronger the bokeh effect. With the iPhone 13, “f2.0” offers the strongest background blur, with “f16” being the least.
- With the flash icon on the bottom right, you can configure the video LED to “Always Off” or “Automatic”. With the latter setting, the iPhone signals you before recording whether the LED is about to be activated or not.
- The small “<” arrow brings the two above-mentioned settings to the right of the display, and also a “±” symbol for exposure correction when filming in Cinematic Mode.
- Tapping on the “1x” will let you switch between the wide-angle and telephoto lens on the iPhone 13 Pro and iPhone 13 Pro Max. The double arrow at the top right switches to the selfie camera. The ultra-wide-angle cameras do not (currently) support Cinematic Mode.
Note that the resolution in Cinematic Mode is limited to Full HD at 1920 x 1080 pixels at 30 frames per second. However, Dolby Vision HDR is also available here.
Cinema Mode: How to edit your videos
The biggest advantage that Cinematic Mode has over the current competition: You can still adjust the focus in the videos after recording. This way, you can perfectly adjust the focus transitions according to the action recorded. By the way, editing after the fact works not only on iPhone 13 models, but also on the following Apple devices in the Photos app:
For macOS, Apple allows editing on the computer using Final Cut and iMovie. We also explain how to use iMovie to edit your Cinematic videos in this article.
Edit Cinematic Mode videos on iOS
Editing videos on iOS is as simple as it gets. Simply open the clip in the Photos app and click “Edit”. You will then see the video with the thumbnail timeline right below. What’s new here is an additional timeline that shows when Cinema Mode automatically and manually changes the focus. Here you can add new focus changes or eliminate existing ones at will. In the following clip you can see how this works:
Edit Cinematic Mode videos on iMovie
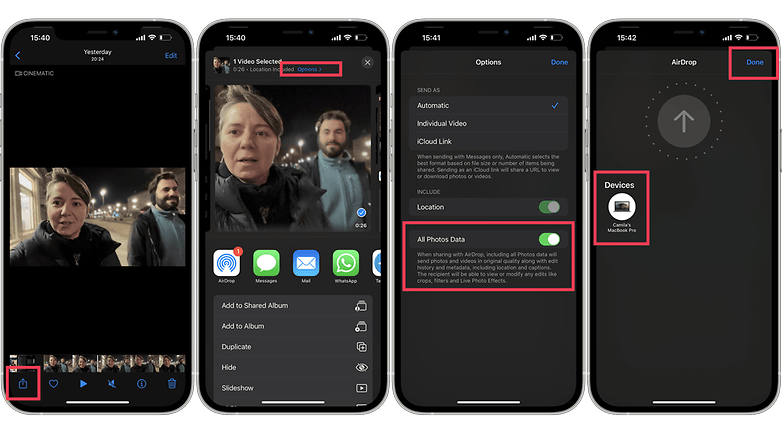
The first thing to know about editing videos on another device – like a MacBook – is that you will have to send the clips via iCloud Photos or AirDrop. Otherwise, you’ll lose the depth information that the iPhone stored in Cinematic Mode. Before doing that though, make sure that the option All Photos Data is toggled. Here is how to do that:
- In the Photos app on your iPhone, open the Cinematic mode clip or select multiple clips, then tap the Share button.
- Tap Options at the top of the screen, turn on All Photos Data, then tap Done (you will need to turn this option on each time you transfer using AirDrop).
- Tap AirDrop, then, in the Devices list, tap the Mac you want to transfer the clip to.
All Photos Data is toggled before sharing Cinematic Mode files on macOS / © NextPit
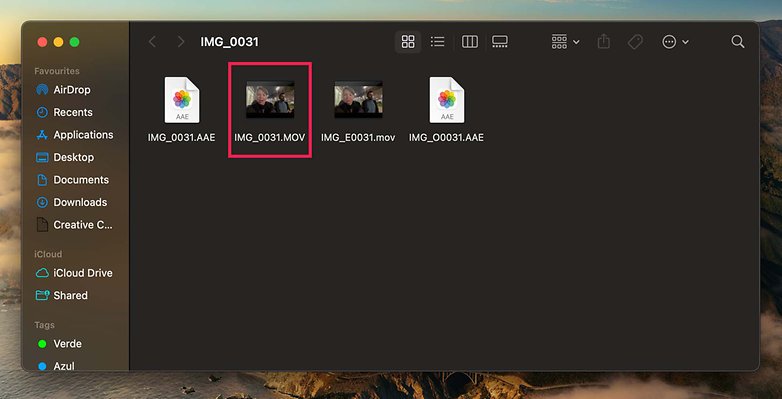
Also note that for each Cinematic clip that you transfer using AirDrop, a folder containing four files appears on the receiving Mac. In the folder, locate the MOV file that does not begin with “IMG_E,” then import it into iMovie.
After importing your Cinematic video files into iMovie from iPhone 13, editing the videos using Apple’s free video editor is easy. Simply open the right clip as a new iMovie project, drag and drop the clip into the video timeline, and select the camera icon on the top of the video preview.
After that, just select the box “Depth of field” and you will be able to manually changes the focus. Here you can add new focus changes or eliminate existing ones at will. All the steps are explained in the following video gallery:
Conclusion
In the 90s and 2000s, amateur videographers were still crafting DoF adapters for videos with bokeh. Then in the ’10s, DSLRs and DSLMs democratized filming with depth of field. And now it’s the turn for smartphones to experience this revolution. Sure, Huawei has had the feature on board since the Mate 20 while Samsung offered this option in the Galaxy S20 series. But let’s be honest: Have you noticed this?
I’m going to venture a prediction: the Cinematic Mode in the iPhone 13 will ensure that your Facebook, Instagram, and TikTok feeds contain more and more videos in the coming weeks, with the majority of these videos featuring depth of field. These will not just be from professional content creators, but from friends and family, too! What do you think?
The article was updated in February 2022 and the tutorial on how to use iMovie to edit Cinematic mode videos on computer added.
[ad_2]


