
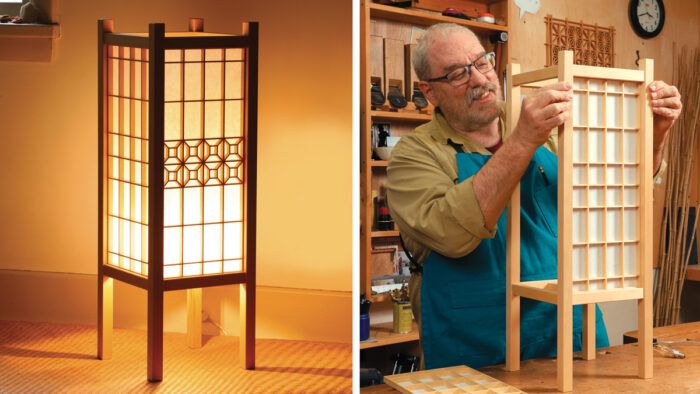
Synopsis: The soft glow of an Andon lamp, whether it is the oil-lit style of bygone days or today’s electric versions, highlights the clean lines and simple beauty of traditional Japanese woodworking. This lamp, by Craig Vandall Stevens, features mitered tenons joining the rails to the legs, and kumiko panels that are made separately and slipped into the lamp’s frame. The techniques involved are not difficult, but precision is required.
Andon lamps capture the clean lines and simple beauty of traditional Japanese woodworking. The original, oil-lit style is no longer commonly used, but modern Andon designs with electric fixtures are plentiful. Although some traditional Andon lamps had hinged panels and could be opened to shed more direct light, Andons primarily provided accent light and a warm aesthetic statement rather than bright light to read by. I build mine in the same spirit. The size I’ll demonstrate is suitable for a tabletop or floor lamp.
The Andon (pronounced ahn dohn) can be made in various ways, offering a range of design possibilities and levels of woodworking complexity. In this version, the rails of the lamp frame are joined to the legs with mitered tenons. As to the thin strips, or kumiko, that form the lamp’s gridded panels, in many original Andons they were tenoned into the lamp frame’s legs and rails. For this lamp I used a different method, making four separate lap-jointed kumiko panels that are press-fit into the lamp’s frame. You can give your kumiko panels a plain grid pattern—relatively simple or more complex—or add one of the many traditional infill patterns. To see how I make the decorative kumiko pattern for this lamp, see Handwork.

Millwork
The techniques for the lamp frame and kumiko panels are straightforward, but throughout the process precision is paramount. I start by building a mockup of the lamp frame in poplar, screwing it together. When I have the shape and size right, I make story sticks from the mockup: one the length of a leg, which I mark with the location of the two rails; another the length of a rail (not including tenons). I use the story sticks throughout the milling and joinery process.
In the completed lamp frame, the rails will be inset from the outside faces of the legs. But because it’s easier to cut centered joints than offset ones, I mill the rails and legs to the same dimension, 7⁄8 in. square. Only after cutting centered tenons do I rip the rails to their final width, removing 1⁄16 in. from their outside face.
 From
From To view the entire article, please click the View PDF button below.
More like this
Download FREE PDF


