
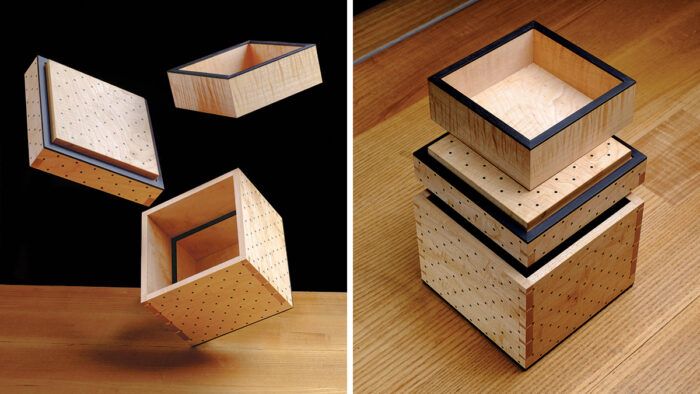
Synopsis: Small and sweet, with mitered dovetail joinery and dozens of tiny inlaid ebony dots, this lidded box was designed as a gift and it makes a great one. Vasko Sotirov’s attention to detail shows in every meticulous aspect of this project.
Recently I received a commission from a German gentleman for a little box he wanted to give as a surprise to his wife-to-be. No other details were added to his request. He liked my work and decided to give me carte blanche for everything. Exciting, but also very hard. It’s always a challenge to design and build something that will be really meaningful to someone else; especially in this case, when I couldn’t actually talk to the man’s fiancée. But after a few video calls with her future husband, I grasped some important fulcrum points to consider for the design: a little box, elegant and formal as its future owner but at the same time a bit playful; no crazy proportions or bold colors, just linear and rational, yet completely adorned with little circular dots; a polka dot pattern.
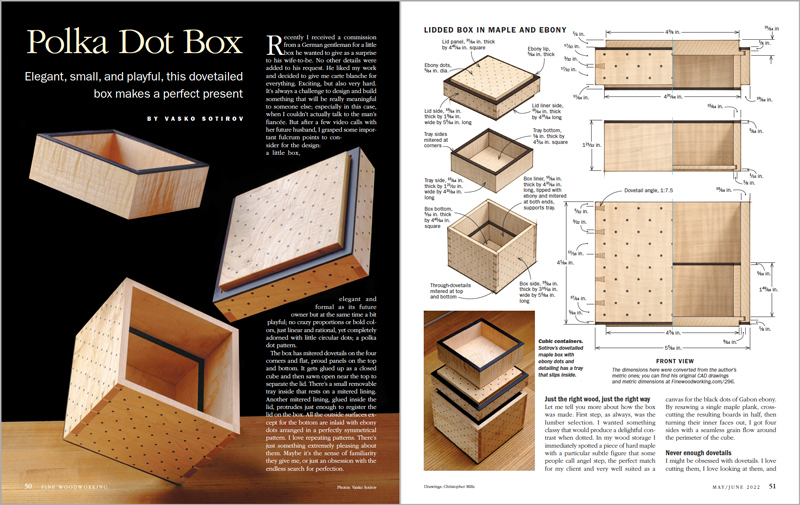
The box has mitered dovetails on the four corners and flat, proud panels on the top and bottom. It gets glued up as a closed cube and then sawn open near the top to separate the lid. There’s a small removable tray inside that rests on a mitered lining. Another mitered lining, glued inside the lid, protrudes just enough to register the lid on the box. All the outside surfaces except for the bottom are inlaid with ebony dots arranged in a perfectly symmetrical pattern. I love repeating patterns. There’s just something extremely pleasing about them. Maybe it’s the sense of familiarity they give me, or just an obsession with the endless search for perfection.
Just the right wood, just the right way
Let me tell you more about how the box was made. First step, as always, was the lumber selection. I wanted something classy that would produce a delightful contrast when dotted. In my wood storage I immediately spotted a piece of hard maple with a particular subtle figure that some people call angel step, the perfect match for my client and very well suited as a canvas for the black dots of Gabon ebony. By resawing a single maple plank, crosscutting the resulting boards in half, then turning their inner faces out, I got four sides with a seamless grain flow around the perimeter of the cube.

Never enough dovetails

I might be obsessed with dovetails. I love cutting them, I love looking at them, and I love how versatile they are. In laying out these dovetails, I decided on five whole tails and mitered half tails at the ends. I added about 1/8 in. to the width of the tails that were destined to be cut through during the lid separation to compensate for the wood lost to sawing and smoothing.
Mitering the ends of a dovetail joint adds a couple of steps but gives a more refined look to the whole piece. The steps for making this joint are the same as for cutting normal through-dovetails until just after the tails are cut and the pins are traced. When making the first and last pins, you have to make a cut with the sawblade tilted up at an angle of 45°—similar to the cuts you make with half-blind dovetails. After cutting this angled kerf, I remove the bulk of the waste with a cross-grain saw-cut. Then I refine the miter with a chisel. When it comes to the tail board, there’s no need to make the inclined kerf before mitering the first and last tails.

Assemble and separate
Well-fitted dovetail joints don’t need to be clamped while drying, which means you can split the glue-up into less stressful subassemblies. I glued two of the box sides together, checked for square, and set them aside. Then I did the same with the other two. I did these glue-ups by clamping a pin board upright in a bench vise and tapping the tails with a hammer until they were seated. I used a pine caul to prevent marring the surface and getting glue on the hammer. Finally, I glued the two L-shaped assemblies together, capturing the top and bottom panels between them.
From Fine Woodworking #296
To view the entire article, please click the View PDF button below.
Download FREE PDF


